Introduction
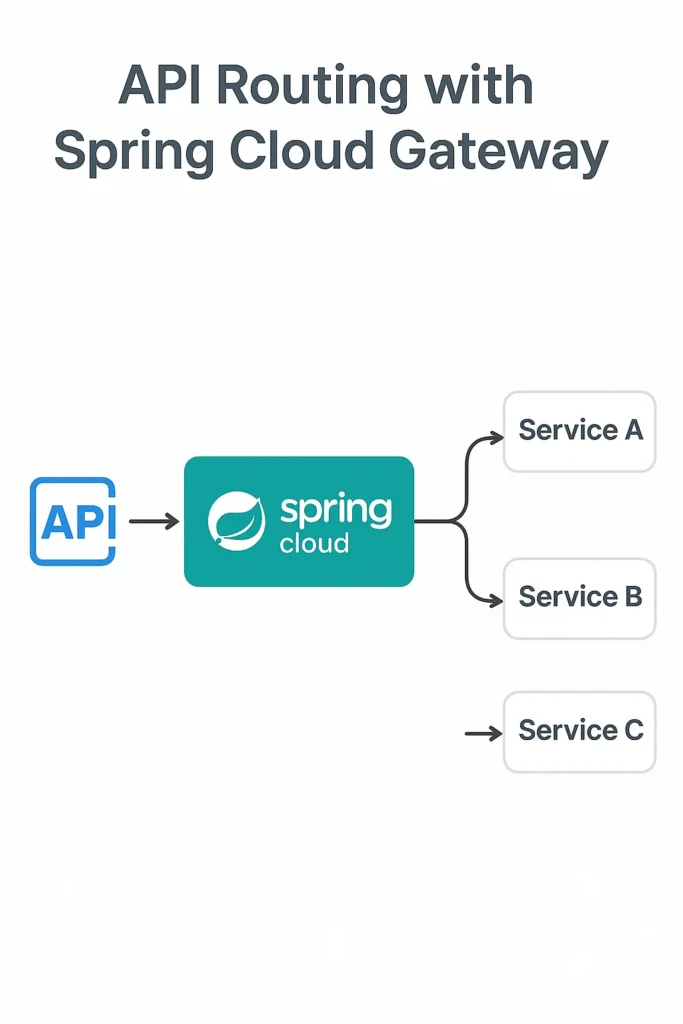
When building microservices, routing requests correctly is one of the most important pieces of the architecture. Instead of calling services directly, applications rely on an API gateway to route traffic, apply rules, handle authentication, and enforce policies. Spring Cloud Gateway makes this process simple, fast, and reactive.
In this comprehensive guide, you’ll learn how Spring Cloud Gateway works, how to define routes with predicates and filters, implement rate limiting, add authentication, integrate with service discovery, and build custom filters for advanced use cases.
What Is Spring Cloud Gateway?
Spring Cloud Gateway is a lightweight, reactive API gateway built on top of Spring WebFlux and Project Reactor. It provides a simple way to route requests to downstream services while applying filters such as authentication, rate limiting, logging, and header manipulation. Because it uses a reactive engine, it offers strong performance even under heavy load.
Key Features
- Dynamic routing based on paths, headers, query parameters, and more
- Reactive and non-blocking architecture for high throughput
- Extensible filters for request/response modification
- Built-in rate limiting with Redis integration
- Circuit breaker support with Resilience4j
- Service discovery integration with Eureka, Consul, or Kubernetes
- Load balancing across service instances
Gateway Architecture
# Spring Cloud Gateway Request Flow
# ==================================
#
#  Client Request
#       ↓
#  Gateway Handler Mapping (matches route predicates)
#       ↓
#  Pre-Filters (authentication, logging, rate limiting)
#       ↓
#  Proxy to Backend Service
#       ↓
#  Post-Filters (response modification, metrics)
#       ↓
#  Client Response
Project Setup
Dependencies
<!-- pom.xml -->
<parent>
    <groupId>org.springframework.boot</groupId>
    <artifactId>spring-boot-starter-parent</artifactId>
    <version>3.2.0</version>
</parent>

<properties>
    <java.version>17</java.version>
    <spring-cloud.version>2023.0.0</spring-cloud.version>
</properties>

<dependencies>
    <!-- Gateway -->
    <dependency>
        <groupId>org.springframework.cloud</groupId>
        <artifactId>spring-cloud-starter-gateway</artifactId>
    </dependency>

    <!-- Service Discovery -->
    <dependency>
        <groupId>org.springframework.cloud</groupId>
        <artifactId>spring-cloud-starter-netflix-eureka-client</artifactId>
    </dependency>

    <!-- Rate Limiting with Redis -->
    <dependency>
        <groupId>org.springframework.boot</groupId>
        <artifactId>spring-boot-starter-data-redis-reactive</artifactId>
    </dependency>

    <!-- Circuit Breaker -->
    <dependency>
        <groupId>org.springframework.cloud</groupId>
        <artifactId>spring-cloud-starter-circuitbreaker-reactor-resilience4j</artifactId>
    </dependency>

    <!-- Security (OAuth2 Resource Server) -->
    <dependency>
        <groupId>org.springframework.boot</groupId>
        <artifactId>spring-boot-starter-oauth2-resource-server</artifactId>
    </dependency>

    <!-- Actuator for monitoring -->
    <dependency>
        <groupId>org.springframework.boot</groupId>
        <artifactId>spring-boot-starter-actuator</artifactId>
    </dependency>
</dependencies>

<dependencyManagement>
    <dependencies>
        <dependency>
            <groupId>org.springframework.cloud</groupId>
            <artifactId>spring-cloud-dependencies</artifactId>
            <version>${spring-cloud.version}</version>
            <type>pom</type>
            <scope>import</scope>
        </dependency>
    </dependencies>
</dependencyManagement>
Route Configuration
YAML Configuration
# application.yml
server:
  port: 8080

spring:
  application:
    name: api-gateway

  cloud:
    gateway:
      # Global CORS configuration
      globalcors:
        corsConfigurations:
          '[/**]':
            allowedOrigins: "*"
            allowedMethods:
              - GET
              - POST
              - PUT
              - DELETE
              - OPTIONS
            allowedHeaders: "*"
            maxAge: 3600

      # Default filters applied to all routes
      default-filters:
        - DedupeResponseHeader=Access-Control-Allow-Origin
        - AddResponseHeader=X-Gateway-Version, v1.0

      routes:
        # User Service Route
        - id: user-service
          uri: lb://user-service  # Load balanced to Eureka service
          predicates:
            - Path=/api/users/**
            - Method=GET,POST,PUT,DELETE
          filters:
            - StripPrefix=1  # Remove /api prefix
            - AddRequestHeader=X-Source, gateway
            - name: CircuitBreaker
              args:
                name: userServiceCB
                fallbackUri: forward:/fallback/users

        # Order Service Route
        - id: order-service
          uri: lb://order-service
          predicates:
            - Path=/api/orders/**
          filters:
            - StripPrefix=1
            - name: RequestRateLimiter
              args:
                redis-rate-limiter.replenishRate: 10
                redis-rate-limiter.burstCapacity: 20
                key-resolver: "#{@userKeyResolver}"

        # Product Service with Path Rewriting
        - id: product-service
          uri: lb://product-service
          predicates:
            - Path=/api/v1/products/**
          filters:
            - RewritePath=/api/v1/products/(?<segment>.*), /products/${segment}

        # Auth Service (public)
        - id: auth-service
          uri: lb://auth-service
          predicates:
            - Path=/auth/**
          filters:
            - name: CircuitBreaker
              args:
                name: authServiceCB
                fallbackUri: forward:/fallback/auth

        # Websocket Support
        - id: notifications-ws
          uri: lb:ws://notification-service
          predicates:
            - Path=/ws/notifications/**

eureka:
  client:
    service-url:
      defaultZone: http://localhost:8761/eureka/

# Rate Limiter Redis Configuration
spring.data.redis:
  host: localhost
  port: 6379

# Circuit Breaker Configuration
resilience4j:
  circuitbreaker:
    instances:
      userServiceCB:
        slidingWindowSize: 10
        failureRateThreshold: 50
        waitDurationInOpenState: 10000
        permittedNumberOfCallsInHalfOpenState: 3
      authServiceCB:
        slidingWindowSize: 5
        failureRateThreshold: 50
        waitDurationInOpenState: 5000
  timelimiter:
    instances:
      userServiceCB:
        timeoutDuration: 3s
Java Configuration
// config/GatewayConfig.java
package com.example.gateway.config;

import org.springframework.cloud.gateway.route.RouteLocator;
import org.springframework.cloud.gateway.route.builder.RouteLocatorBuilder;
import org.springframework.context.annotation.Bean;
import org.springframework.context.annotation.Configuration;
import org.springframework.http.HttpMethod;
import org.springframework.http.HttpStatus;

import java.time.Duration;

@Configuration
public class GatewayConfig {

    @Bean
    public RouteLocator customRoutes(RouteLocatorBuilder builder) {
        return builder.routes()
            // User Service with multiple predicates
            .route("user-service", r -> r
                .path("/api/users/**")
                .and()
                .method(HttpMethod.GET, HttpMethod.POST, HttpMethod.PUT, HttpMethod.DELETE)
                .filters(f -> f
                    .stripPrefix(1)
                    .addRequestHeader("X-Source", "gateway")
                    .addResponseHeader("X-Response-Time", String.valueOf(System.currentTimeMillis()))
                    .circuitBreaker(config -> config
                        .setName("userServiceCB")
                        .setFallbackUri("forward:/fallback/users"))
                    .retry(config -> config
                        .setRetries(3)
                        .setStatuses(HttpStatus.SERVICE_UNAVAILABLE)
                        .setBackoff(Duration.ofMillis(100), Duration.ofSeconds(1), 2, true)))
                .uri("lb://user-service"))

            // Header-based routing (API versioning)
            .route("product-v2", r -> r
                .path("/api/products/**")
                .and()
                .header("X-API-Version", "v2")
                .filters(f -> f.stripPrefix(1))
                .uri("lb://product-service-v2"))

            // Default product route (v1)
            .route("product-v1", r -> r
                .path("/api/products/**")
                .filters(f -> f.stripPrefix(1))
                .uri("lb://product-service"))

            // Query parameter routing
            .route("search-service", r -> r
                .path("/api/search")
                .and()
                .query("type", "products|users|orders")
                .filters(f -> f.stripPrefix(1))
                .uri("lb://search-service"))

            // Weight-based routing (canary deployment)
            .route("order-service-canary", r -> r
                .path("/api/orders/**")
                .and()
                .weight("orders", 10)  // 10% traffic
                .filters(f -> f.stripPrefix(1))
                .uri("lb://order-service-canary"))

            .route("order-service-stable", r -> r
                .path("/api/orders/**")
                .and()
                .weight("orders", 90)  // 90% traffic
                .filters(f -> f.stripPrefix(1))
                .uri("lb://order-service"))

            .build();
    }
}
Rate Limiting
// config/RateLimiterConfig.java
package com.example.gateway.config;

import org.springframework.cloud.gateway.filter.ratelimit.KeyResolver;
import org.springframework.context.annotation.Bean;
import org.springframework.context.annotation.Configuration;
import reactor.core.publisher.Mono;

@Configuration
public class RateLimiterConfig {

    /**
     * Rate limit by user ID from JWT token
     */
    @Bean
    public KeyResolver userKeyResolver() {
        return exchange -> {
            // Extract user from JWT or use IP as fallback
            String user = exchange.getRequest().getHeaders().getFirst("X-User-Id");
            if (user != null) {
                return Mono.just(user);
            }
            // Fallback to IP address
            return Mono.just(
                exchange.getRequest().getRemoteAddress() != null
                    ? exchange.getRequest().getRemoteAddress().getAddress().getHostAddress()
                    : "anonymous"
            );
        };
    }

    /**
     * Rate limit by IP address
     */
    @Bean
    public KeyResolver ipKeyResolver() {
        return exchange -> Mono.just(
            exchange.getRequest().getRemoteAddress() != null
                ? exchange.getRequest().getRemoteAddress().getAddress().getHostAddress()
                : "unknown"
        );
    }

    /**
     * Rate limit by API key
     */
    @Bean
    public KeyResolver apiKeyResolver() {
        return exchange -> {
            String apiKey = exchange.getRequest().getHeaders().getFirst("X-API-Key");
            return Mono.just(apiKey != null ? apiKey : "no-api-key");
        };
    }
}
Custom Filters
Logging Filter
// filter/LoggingGlobalFilter.java
package com.example.gateway.filter;

import org.slf4j.Logger;
import org.slf4j.LoggerFactory;
import org.springframework.cloud.gateway.filter.GatewayFilterChain;
import org.springframework.cloud.gateway.filter.GlobalFilter;
import org.springframework.core.Ordered;
import org.springframework.http.server.reactive.ServerHttpRequest;
import org.springframework.stereotype.Component;
import org.springframework.web.server.ServerWebExchange;
import reactor.core.publisher.Mono;

import java.util.UUID;

@Component
public class LoggingGlobalFilter implements GlobalFilter, Ordered {

    private static final Logger log = LoggerFactory.getLogger(LoggingGlobalFilter.class);
    private static final String CORRELATION_ID = "X-Correlation-ID";
    private static final String START_TIME = "startTime";

    @Override
    public Mono filter(ServerWebExchange exchange, GatewayFilterChain chain) {
        // Generate or extract correlation ID
        String correlationId = exchange.getRequest().getHeaders().getFirst(CORRELATION_ID);
        if (correlationId == null) {
            correlationId = UUID.randomUUID().toString();
        }

        // Store start time for duration calculation
        exchange.getAttributes().put(START_TIME, System.currentTimeMillis());

        // Add correlation ID to request headers
        ServerHttpRequest request = exchange.getRequest().mutate()
            .header(CORRELATION_ID, correlationId)
            .build();

        final String finalCorrelationId = correlationId;

        log.info("Incoming request: {} {} - CorrelationID: {}",
            request.getMethod(),
            request.getURI().getPath(),
            finalCorrelationId);

        return chain.filter(exchange.mutate().request(request).build())
            .then(Mono.fromRunnable(() -> {
                Long startTime = exchange.getAttribute(START_TIME);
                long duration = startTime != null ? System.currentTimeMillis() - startTime : 0;

                log.info("Completed request: {} {} - Status: {} - Duration: {}ms - CorrelationID: {}",
                    request.getMethod(),
                    request.getURI().getPath(),
                    exchange.getResponse().getStatusCode(),
                    duration,
                    finalCorrelationId);
            }));
    }

    @Override
    public int getOrder() {
        return -100; // Run early in the filter chain
    }
}
Authentication Filter
// filter/JwtAuthenticationFilter.java
package com.example.gateway.filter;

import org.springframework.cloud.gateway.filter.GatewayFilter;
import org.springframework.cloud.gateway.filter.factory.AbstractGatewayFilterFactory;
import org.springframework.http.HttpHeaders;
import org.springframework.http.HttpStatus;
import org.springframework.stereotype.Component;
import org.springframework.web.server.ServerWebExchange;
import reactor.core.publisher.Mono;

import java.util.List;

@Component
public class JwtAuthenticationFilter extends AbstractGatewayFilterFactory {

    private final JwtValidator jwtValidator;

    public JwtAuthenticationFilter(JwtValidator jwtValidator) {
        super(Config.class);
        this.jwtValidator = jwtValidator;
    }

    @Override
    public GatewayFilter apply(Config config) {
        return (exchange, chain) -> {
            // Skip authentication for public paths
            String path = exchange.getRequest().getURI().getPath();
            if (isPublicPath(path, config.getPublicPaths())) {
                return chain.filter(exchange);
            }

            // Extract Authorization header
            String authHeader = exchange.getRequest().getHeaders().getFirst(HttpHeaders.AUTHORIZATION);

            if (authHeader == null || !authHeader.startsWith("Bearer ")) {
                return onError(exchange, "Missing or invalid Authorization header", HttpStatus.UNAUTHORIZED);
            }

            String token = authHeader.substring(7);

            // Validate JWT
            return jwtValidator.validateToken(token)
                .flatMap(claims -> {
                    // Check required roles if configured
                    if (config.getRequiredRoles() != null && !config.getRequiredRoles().isEmpty()) {
                        List userRoles = claims.get("roles", List.class);
                        if (userRoles == null || !userRoles.stream().anyMatch(config.getRequiredRoles()::contains)) {
                            return onError(exchange, "Insufficient permissions", HttpStatus.FORBIDDEN);
                        }
                    }

                    // Add user info to headers for downstream services
                    ServerWebExchange mutatedExchange = exchange.mutate()
                        .request(r -> r
                            .header("X-User-Id", claims.getSubject())
                            .header("X-User-Email", claims.get("email", String.class))
                            .header("X-User-Roles", String.join(",", claims.get("roles", List.class))))
                        .build();

                    return chain.filter(mutatedExchange);
                })
                .onErrorResume(e -> onError(exchange, "Invalid token: " + e.getMessage(), HttpStatus.UNAUTHORIZED));
        };
    }

    private boolean isPublicPath(String path, List publicPaths) {
        if (publicPaths == null) return false;
        return publicPaths.stream().anyMatch(path::startsWith);
    }

    private Mono onError(ServerWebExchange exchange, String message, HttpStatus status) {
        exchange.getResponse().setStatusCode(status);
        exchange.getResponse().getHeaders().add("X-Error-Message", message);
        return exchange.getResponse().setComplete();
    }

    public static class Config {
        private List publicPaths;
        private List requiredRoles;

        public List getPublicPaths() { return publicPaths; }
        public void setPublicPaths(List publicPaths) { this.publicPaths = publicPaths; }
        public List getRequiredRoles() { return requiredRoles; }
        public void setRequiredRoles(List requiredRoles) { this.requiredRoles = requiredRoles; }
    }
}
Request Body Modification Filter
// filter/RequestBodyModificationFilter.java
package com.example.gateway.filter;

import com.fasterxml.jackson.databind.JsonNode;
import com.fasterxml.jackson.databind.ObjectMapper;
import com.fasterxml.jackson.databind.node.ObjectNode;
import org.springframework.cloud.gateway.filter.GatewayFilter;
import org.springframework.cloud.gateway.filter.factory.AbstractGatewayFilterFactory;
import org.springframework.cloud.gateway.filter.factory.rewrite.ModifyRequestBodyGatewayFilterFactory;
import org.springframework.stereotype.Component;
import reactor.core.publisher.Mono;

@Component
public class AddMetadataFilter extends AbstractGatewayFilterFactory {

    private final ModifyRequestBodyGatewayFilterFactory modifyRequestBodyFilter;
    private final ObjectMapper objectMapper;

    public AddMetadataFilter(
            ModifyRequestBodyGatewayFilterFactory modifyRequestBodyFilter,
            ObjectMapper objectMapper) {
        super(Config.class);
        this.modifyRequestBodyFilter = modifyRequestBodyFilter;
        this.objectMapper = objectMapper;
    }

    @Override
    public GatewayFilter apply(Config config) {
        return modifyRequestBodyFilter.apply(
            new ModifyRequestBodyGatewayFilterFactory.Config()
                .setRewriteFunction(JsonNode.class, JsonNode.class, (exchange, originalBody) -> {
                    if (originalBody == null) {
                        return Mono.empty();
                    }

                    // Add gateway metadata to request body
                    ObjectNode modifiedBody = originalBody.deepCopy();
                    ObjectNode metadata = modifiedBody.putObject("_gateway_metadata");
                    metadata.put("timestamp", System.currentTimeMillis());
                    metadata.put("gateway_version", "1.0");
                    metadata.put("source_ip",
                        exchange.getRequest().getRemoteAddress() != null
                            ? exchange.getRequest().getRemoteAddress().getHostString()
                            : "unknown");

                    return Mono.just(modifiedBody);
                })
        );
    }

    public static class Config {
        // Configuration options if needed
    }
}
Fallback Controller
// controller/FallbackController.java
package com.example.gateway.controller;

import org.springframework.http.HttpStatus;
import org.springframework.http.ResponseEntity;
import org.springframework.web.bind.annotation.GetMapping;
import org.springframework.web.bind.annotation.RequestMapping;
import org.springframework.web.bind.annotation.RestController;

import java.time.LocalDateTime;
import java.util.Map;

@RestController
@RequestMapping("/fallback")
public class FallbackController {

    @GetMapping("/users")
    public ResponseEntity> userServiceFallback() {
        return ResponseEntity.status(HttpStatus.SERVICE_UNAVAILABLE)
            .body(Map.of(
                "error", "Service Unavailable",
                "message", "User service is temporarily unavailable. Please try again later.",
                "service", "user-service",
                "timestamp", LocalDateTime.now().toString()
            ));
    }

    @GetMapping("/orders")
    public ResponseEntity> orderServiceFallback() {
        return ResponseEntity.status(HttpStatus.SERVICE_UNAVAILABLE)
            .body(Map.of(
                "error", "Service Unavailable",
                "message", "Order service is temporarily unavailable. Please try again later.",
                "service", "order-service",
                "timestamp", LocalDateTime.now().toString()
            ));
    }

    @GetMapping("/auth")
    public ResponseEntity> authServiceFallback() {
        return ResponseEntity.status(HttpStatus.SERVICE_UNAVAILABLE)
            .body(Map.of(
                "error", "Service Unavailable",
                "message", "Authentication service is temporarily unavailable.",
                "service", "auth-service",
                "timestamp", LocalDateTime.now().toString()
            ));
    }

    @GetMapping("/default")
    public ResponseEntity> defaultFallback() {
        return ResponseEntity.status(HttpStatus.SERVICE_UNAVAILABLE)
            .body(Map.of(
                "error", "Service Unavailable",
                "message", "The requested service is temporarily unavailable.",
                "timestamp", LocalDateTime.now().toString()
            ));
    }
}
Security Configuration
// config/SecurityConfig.java
package com.example.gateway.config;

import org.springframework.context.annotation.Bean;
import org.springframework.context.annotation.Configuration;
import org.springframework.security.config.annotation.web.reactive.EnableWebFluxSecurity;
import org.springframework.security.config.web.server.ServerHttpSecurity;
import org.springframework.security.web.server.SecurityWebFilterChain;

@Configuration
@EnableWebFluxSecurity
public class SecurityConfig {

    @Bean
    public SecurityWebFilterChain springSecurityFilterChain(ServerHttpSecurity http) {
        return http
            .csrf(csrf -> csrf.disable())
            .authorizeExchange(exchange -> exchange
                // Public endpoints
                .pathMatchers("/auth/**").permitAll()
                .pathMatchers("/actuator/health").permitAll()
                .pathMatchers("/fallback/**").permitAll()
                // Protected endpoints
                .pathMatchers("/api/admin/**").hasRole("ADMIN")
                .pathMatchers("/api/**").authenticated()
                .anyExchange().authenticated()
            )
            .oauth2ResourceServer(oauth2 -> oauth2
                .jwt(jwt -> {})
            )
            .build();
    }
}
Common Mistakes to Avoid
1. Not Propagating Headers
# BAD: User context lost in downstream services
filters:
  - StripPrefix=1

# GOOD: Propagate authentication headers
filters:
  - StripPrefix=1
  - PreserveHostHeader
  - TokenRelay  # For OAuth2
2. Missing Timeouts
# BAD: No timeouts, gateway can hang
spring:
  cloud:
    gateway:
      routes:
        - id: slow-service
          uri: lb://slow-service

# GOOD: Always configure timeouts
spring:
  cloud:
    gateway:
      httpclient:
        connect-timeout: 2000
        response-timeout: 5s
      routes:
        - id: slow-service
          uri: lb://slow-service
          metadata:
            response-timeout: 10000
            connect-timeout: 2000
3. Hardcoded URIs
# BAD: Hardcoded service URLs
uri: http://localhost:8081

# GOOD: Use service discovery
uri: lb://user-service
4. No Circuit Breaker
# BAD: Failing service brings down gateway
routes:
  - id: user-service
    uri: lb://user-service

# GOOD: Circuit breaker with fallback
routes:
  - id: user-service
    uri: lb://user-service
    filters:
      - name: CircuitBreaker
        args:
          name: userCB
          fallbackUri: forward:/fallback/users
5. Rate Limiting Without Key Resolver
# BAD: Global rate limit affects all users equally
filters:
  - name: RequestRateLimiter
    args:
      redis-rate-limiter.replenishRate: 10

# GOOD: Per-user rate limiting
filters:
  - name: RequestRateLimiter
    args:
      redis-rate-limiter.replenishRate: 10
      redis-rate-limiter.burstCapacity: 20
      key-resolver: "#{@userKeyResolver}"
Monitoring and Actuator
# Enable gateway actuator endpoints
management:
  endpoints:
    web:
      exposure:
        include: health,info,metrics,gateway
  endpoint:
    gateway:
      enabled: true

# Access endpoints:
# GET /actuator/gateway/routes - List all routes
# GET /actuator/gateway/routes/{id} - Get specific route
# POST /actuator/gateway/refresh - Refresh routes
# GET /actuator/metrics/spring.cloud.gateway.requests - Request metrics
When to Use Spring Cloud Gateway
Use Spring Cloud Gateway when you need:
- A lightweight gateway for Spring-based microservices
- Reactive, high-performance routing
- Deep integration with Spring Security and Spring Cloud
- Programmatic route configuration
- Service discovery with Eureka or Consul
Consider alternatives like Kong, Istio, or AWS API Gateway for advanced features like API monetization, complex traffic management, or service mesh integration.
Final Thoughts
Spring Cloud Gateway is an excellent choice for microservice routing in Spring-based systems. It provides a simple, flexible, and reactive way to route traffic, apply filters, and secure your APIs. Start with basic routes, then enhance them with authentication, rate limiting, circuit breakers, and custom filters as your needs grow.
The gateway is often the first line of defense and the single entry point for your microservices architecture. Invest time in proper configuration, monitoring, and security to build a robust API layer.
To learn about service discovery integration, read Service Discovery with Spring Cloud Eureka. For reactive programming patterns, see Building Reactive APIs with Spring WebFlux. For detailed configuration guides, visit the Spring Cloud Gateway documentation.

1 Comment