Introduction
Rate limiting controls how many requests users can make within a specific time window. It’s a fundamental protection mechanism that keeps APIs stable, prevents abuse, and ensures fair usage among clients. Without it, a single bad actor—or even a legitimate client with a bug—could easily overload your system.
Companies like Stripe, GitHub, and Twitter rely heavily on sophisticated rate limiting to serve billions of API requests while maintaining quality of service. Understanding these algorithms is essential for building production-grade APIs and microservices.
In this comprehensive guide, we’ll explore the most common rate-limiting algorithms, their trade-offs, and implementation patterns with code examples.
Why Rate Limiting Matters
When too many requests hit your backend, performance degrades rapidly. A proper rate-limit policy helps you:
- Prevent cascading failures: Protect downstream services from overload
- Mitigate DDoS attacks: Limit impact of malicious traffic
- Control cloud costs: Prevent runaway usage and unexpected bills
- Ensure fairness: Prevent one user from monopolizing resources
- Maintain SLAs: Guarantee consistent response times
- Enable tiered pricing: Differentiate between free and paid tiers
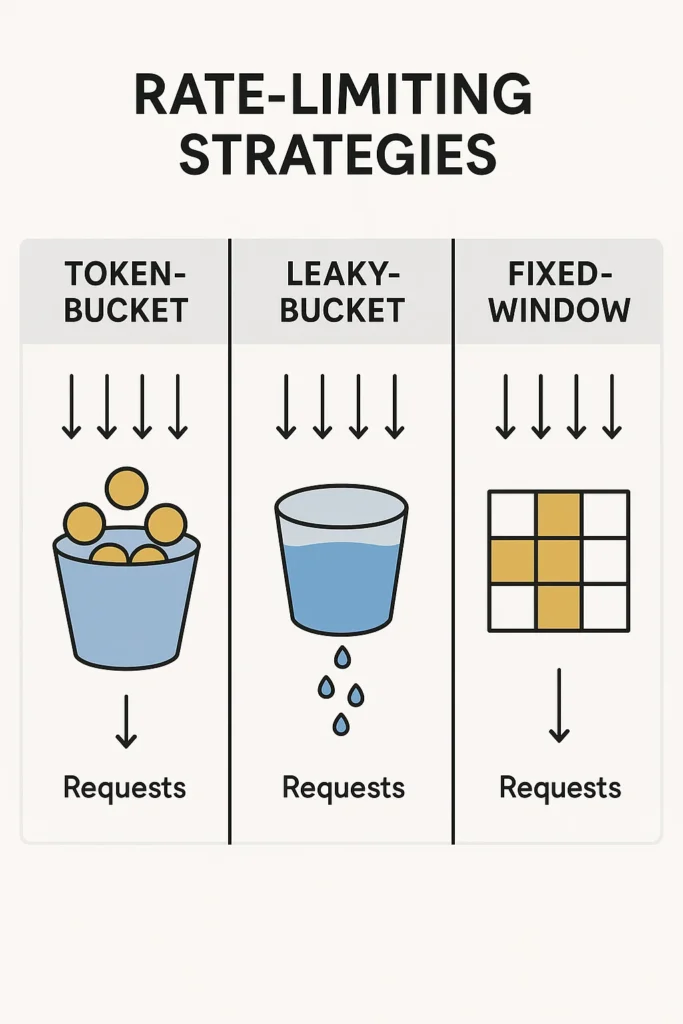
Fixed-Window Algorithm
The fixed-window algorithm counts requests in a strict time period (for example, 100 per minute). When the count exceeds the limit, new requests are rejected until the next window begins.
// Fixed-window rate limiter implementation
import Redis from 'ioredis';

class FixedWindowRateLimiter {
  private redis: Redis;
  private windowSizeMs: number;
  private maxRequests: number;

  constructor(redis: Redis, windowSizeMs: number, maxRequests: number) {
    this.redis = redis;
    this.windowSizeMs = windowSizeMs;
    this.maxRequests = maxRequests;
  }

  async isAllowed(clientId: string): Promise<{ allowed: boolean; remaining: number; resetAt: number }> {
    const now = Date.now();
    const windowStart = Math.floor(now / this.windowSizeMs) * this.windowSizeMs;
    const key = `ratelimit:fixed:${clientId}:${windowStart}`;

    // Increment counter and set expiry atomically
    const count = await this.redis.incr(key);

    if (count === 1) {
      // First request in window, set expiry
      await this.redis.pexpire(key, this.windowSizeMs);
    }

    const allowed = count <= this.maxRequests;
    const remaining = Math.max(0, this.maxRequests - count);
    const resetAt = windowStart + this.windowSizeMs;

    return { allowed, remaining, resetAt };
  }
}

// Usage
const limiter = new FixedWindowRateLimiter(redis, 60000, 100); // 100 req/min

const result = await limiter.isAllowed('user-123');
if (!result.allowed) {
  // Return 429 Too Many Requests
  res.status(429).json({
    error: 'Rate limit exceeded',
    retryAfter: Math.ceil((result.resetAt - Date.now()) / 1000),
  });
}
Advantages:
- Very simple to implement and understand
- Low memory footprint (one counter per window)
- Predictable reset times
Disadvantages:
- Boundary problem: Allows burst of 2x limit at window boundaries
- A user could make 100 requests at 0:59 and 100 more at 1:00
Sliding Window Log Algorithm
The sliding window log tracks each request timestamp, giving precise control but at higher memory cost:
// Sliding window log implementation
class SlidingWindowLogLimiter {
  private redis: Redis;
  private windowSizeMs: number;
  private maxRequests: number;

  constructor(redis: Redis, windowSizeMs: number, maxRequests: number) {
    this.redis = redis;
    this.windowSizeMs = windowSizeMs;
    this.maxRequests = maxRequests;
  }

  async isAllowed(clientId: string): Promise<{ allowed: boolean; remaining: number }> {
    const now = Date.now();
    const windowStart = now - this.windowSizeMs;
    const key = `ratelimit:sliding:${clientId}`;

    // Use Redis sorted set with timestamp as score
    const pipeline = this.redis.pipeline();

    // Remove old entries outside the window
    pipeline.zremrangebyscore(key, 0, windowStart);

    // Count current entries
    pipeline.zcard(key);

    // Add current request
    pipeline.zadd(key, now, `${now}-${Math.random()}`);

    // Set expiry on the key
    pipeline.pexpire(key, this.windowSizeMs);

    const results = await pipeline.exec();
    const currentCount = results![1][1] as number;

    const allowed = currentCount < this.maxRequests;
    const remaining = Math.max(0, this.maxRequests - currentCount - 1);

    // If not allowed, remove the request we just added
    if (!allowed) {
      await this.redis.zremrangebyrank(key, -1, -1);
    }

    return { allowed, remaining };
  }
}
Advantages:
- Precise request counting with no boundary issues
- Accurate rate limiting for any time window
Disadvantages:
- Higher memory usage (stores each request timestamp)
- More Redis operations per request
Sliding Window Counter Algorithm
A hybrid approach that combines the efficiency of fixed windows with the accuracy of sliding windows:
// Sliding window counter - best of both worlds
class SlidingWindowCounterLimiter {
  private redis: Redis;
  private windowSizeMs: number;
  private maxRequests: number;

  constructor(redis: Redis, windowSizeMs: number, maxRequests: number) {
    this.redis = redis;
    this.windowSizeMs = windowSizeMs;
    this.maxRequests = maxRequests;
  }

  async isAllowed(clientId: string): Promise<{ allowed: boolean; remaining: number }> {
    const now = Date.now();
    const currentWindow = Math.floor(now / this.windowSizeMs);
    const previousWindow = currentWindow - 1;

    const currentKey = `ratelimit:swc:${clientId}:${currentWindow}`;
    const previousKey = `ratelimit:swc:${clientId}:${previousWindow}`;

    // Get counts from both windows
    const [currentCount, previousCount] = await Promise.all([
      this.redis.get(currentKey).then(v => parseInt(v || '0')),
      this.redis.get(previousKey).then(v => parseInt(v || '0')),
    ]);

    // Calculate position in current window (0.0 to 1.0)
    const windowProgress = (now % this.windowSizeMs) / this.windowSizeMs;

    // Weighted count: full current + proportional previous
    const weightedCount = currentCount + previousCount * (1 - windowProgress);

    if (weightedCount >= this.maxRequests) {
      return { allowed: false, remaining: 0 };
    }

    // Increment current window counter
    const pipeline = this.redis.pipeline();
    pipeline.incr(currentKey);
    pipeline.pexpire(currentKey, this.windowSizeMs * 2); // Keep for overlap
    await pipeline.exec();

    const remaining = Math.max(0, Math.floor(this.maxRequests - weightedCount - 1));
    return { allowed: true, remaining };
  }
}
Advantages:
- Smooth rate limiting without boundary spikes
- Low memory footprint (only two counters)
- Good balance of accuracy and performance
Disadvantages:
- Slightly more complex than fixed window
- Approximation (not exact count)
Token-Bucket Algorithm
The token-bucket approach uses tokens that fill the "bucket" at a steady rate. Each request consumes one token. If the bucket runs empty, the request must wait or gets denied.
// Token bucket implementation
class TokenBucketLimiter {
  private redis: Redis;
  private bucketSize: number;      // Maximum tokens
  private refillRate: number;       // Tokens per second

  constructor(redis: Redis, bucketSize: number, refillRate: number) {
    this.redis = redis;
    this.bucketSize = bucketSize;
    this.refillRate = refillRate;
  }

  async isAllowed(clientId: string, tokensNeeded: number = 1): Promise<{
    allowed: boolean;
    tokensRemaining: number;
    retryAfterMs?: number;
  }> {
    const key = `ratelimit:token:${clientId}`;
    const now = Date.now();

    // Lua script for atomic token bucket update
    const script = `
      local key = KEYS[1]
      local bucket_size = tonumber(ARGV[1])
      local refill_rate = tonumber(ARGV[2])
      local now = tonumber(ARGV[3])
      local tokens_needed = tonumber(ARGV[4])

      -- Get current state
      local state = redis.call('HMGET', key, 'tokens', 'last_refill')
      local tokens = tonumber(state[1]) or bucket_size
      local last_refill = tonumber(state[2]) or now

      -- Calculate tokens to add based on time elapsed
      local elapsed_ms = now - last_refill
      local tokens_to_add = (elapsed_ms / 1000) * refill_rate
      tokens = math.min(bucket_size, tokens + tokens_to_add)

      -- Check if we can satisfy the request
      if tokens >= tokens_needed then
        tokens = tokens - tokens_needed
        redis.call('HMSET', key, 'tokens', tokens, 'last_refill', now)
        redis.call('PEXPIRE', key, 86400000)  -- 24 hour expiry
        return {1, tokens}  -- allowed, remaining tokens
      else
        -- Calculate when we'll have enough tokens
        local tokens_needed_more = tokens_needed - tokens
        local wait_ms = (tokens_needed_more / refill_rate) * 1000
        redis.call('HMSET', key, 'tokens', tokens, 'last_refill', now)
        redis.call('PEXPIRE', key, 86400000)
        return {0, tokens, wait_ms}  -- denied, remaining tokens, wait time
      end
    `;

    const result = await this.redis.eval(
      script,
      1,
      key,
      this.bucketSize,
      this.refillRate,
      now,
      tokensNeeded
    ) as number[];

    const allowed = result[0] === 1;
    const tokensRemaining = result[1];
    const retryAfterMs = result[2];

    return { allowed, tokensRemaining, retryAfterMs };
  }
}

// Usage: 10 tokens bucket, refills at 2 tokens/second
const limiter = new TokenBucketLimiter(redis, 10, 2);

// Allow burst of up to 10 requests, then 2 per second average
const result = await limiter.isAllowed('user-123');
Advantages:
- Allows controlled bursts while maintaining average rate
- Flexible for APIs with irregular but legitimate load
- Natural fit for APIs with varying request costs
Disadvantages:
- More complex to understand and tune
- Burst allowance might not suit all use cases
Leaky-Bucket Algorithm
The leaky-bucket algorithm processes requests at a fixed rate, queuing excess requests:
// Leaky bucket with queue
class LeakyBucketLimiter {
  private redis: Redis;
  private bucketSize: number;    // Queue capacity
  private leakRate: number;      // Requests processed per second

  constructor(redis: Redis, bucketSize: number, leakRate: number) {
    this.redis = redis;
    this.bucketSize = bucketSize;
    this.leakRate = leakRate;
  }

  async isAllowed(clientId: string): Promise<{
    allowed: boolean;
    queuePosition?: number;
    estimatedWaitMs?: number;
  }> {
    const key = `ratelimit:leaky:${clientId}`;
    const now = Date.now();

    const script = `
      local key = KEYS[1]
      local bucket_size = tonumber(ARGV[1])
      local leak_rate = tonumber(ARGV[2])
      local now = tonumber(ARGV[3])

      -- Get current state
      local state = redis.call('HMGET', key, 'queue_size', 'last_leak')
      local queue_size = tonumber(state[1]) or 0
      local last_leak = tonumber(state[2]) or now

      -- Calculate how many requests have "leaked" (been processed)
      local elapsed_ms = now - last_leak
      local leaked = math.floor((elapsed_ms / 1000) * leak_rate)
      queue_size = math.max(0, queue_size - leaked)

      -- Update last_leak time only for the leaked amount
      if leaked > 0 then
        last_leak = last_leak + (leaked / leak_rate) * 1000
      end

      -- Check if we can add to queue
      if queue_size < bucket_size then
        queue_size = queue_size + 1
        redis.call('HMSET', key, 'queue_size', queue_size, 'last_leak', last_leak)
        redis.call('PEXPIRE', key, 86400000)

        -- Calculate wait time based on queue position
        local wait_ms = (queue_size / leak_rate) * 1000
        return {1, queue_size, wait_ms}  -- allowed, position, wait
      else
        return {0, queue_size, 0}  -- denied, queue full
      end
    `;

    const result = await this.redis.eval(
      script,
      1,
      key,
      this.bucketSize,
      this.leakRate,
      now
    ) as number[];

    const allowed = result[0] === 1;
    const queuePosition = result[1];
    const estimatedWaitMs = result[2];

    return { allowed, queuePosition, estimatedWaitMs };
  }
}

// Usage: Queue of 50, processes 10 per second
const limiter = new LeakyBucketLimiter(redis, 50, 10);
Advantages:
- Smooth, consistent output rate
- Protects downstream services from bursts
- Ideal for traffic shaping
Disadvantages:
- Less responsive to legitimate burst traffic
- May introduce latency for queued requests
Choosing the Right Strategy
| Use Case | Recommended Strategy | Reason |
|---|---|---|
| Simple internal APIs | Fixed-Window | Easy to implement, good enough for trusted clients |
| Public REST APIs | Sliding Window Counter | Good accuracy with low overhead |
| APIs with burst traffic | Token-Bucket | Allows legitimate bursts while limiting average |
| Payment processing | Leaky-Bucket | Consistent rate protects downstream systems |
| Webhook delivery | Leaky-Bucket | Smooth delivery rate |
| Per-user + global limits | Token-Bucket (layered) | Multiple bucket layers |
| Real-time gaming | Sliding Window Log | Precise control needed |
Rate Limit HTTP Headers
Always communicate rate limit status to clients:
// Express middleware example
function rateLimitMiddleware(limiter: RateLimiter) {
  return async (req: Request, res: Response, next: NextFunction) => {
    const clientId = req.user?.id || req.ip;
    const result = await limiter.isAllowed(clientId);

    // Standard rate limit headers
    res.setHeader('X-RateLimit-Limit', limiter.maxRequests);
    res.setHeader('X-RateLimit-Remaining', result.remaining);
    res.setHeader('X-RateLimit-Reset', Math.ceil(result.resetAt / 1000));

    if (!result.allowed) {
      res.setHeader('Retry-After', Math.ceil((result.resetAt - Date.now()) / 1000));
      return res.status(429).json({
        error: 'Too Many Requests',
        message: 'Rate limit exceeded. Please retry later.',
        retryAfter: Math.ceil((result.resetAt - Date.now()) / 1000),
      });
    }

    next();
  };
}
Common Mistakes to Avoid
Not considering distributed systems: In-memory rate limiters fail with multiple instances. Always use a shared store like Redis.
Using IP-based limiting only: NAT and proxies can cause many users to share an IP. Combine with API keys or user IDs.
Not communicating limits: Always return rate limit headers so clients can implement backoff strategies.
Setting limits too low: Overly aggressive limits frustrate legitimate users. Monitor actual usage before setting limits.
Ignoring request costs: Not all endpoints are equal. A search query costs more than a status check. Weight requests accordingly.
No bypass for internal services: Service-to-service communication shouldn't count against user limits.
Conclusion
Rate limiting is not a one-size-fits-all solution. The right algorithm depends on your use case, traffic patterns, and tolerance for complexity. Fixed windows work for simple cases, token buckets handle bursty traffic well, and leaky buckets provide smooth output for sensitive downstream systems.
Modern API gateways like Kong, NGINX, Envoy, and AWS API Gateway include built-in support for these algorithms. For custom implementations, Redis provides the atomic operations needed for distributed rate limiting.
To see how rate limiting fits into a larger architecture, check out API Gateway Patterns for SaaS Applications. For more technical details, explore the official NGINX Blog on Rate Limiting.

3 Comments