Most TDD tutorials stop at a calculator function or a FizzBuzz exercise. That’s fine for learning the syntax, but it doesn’t prepare you for the messy decisions that arise when applying test-driven development in practice — where requirements change mid-cycle, edge cases multiply, and you’re constantly deciding what to test next. This guide walks through building a real feature using TDD from start to finish: a shopping cart pricing service with discounts, bulk rules, and tax calculation. Each red-green-refactor cycle builds on the last, showing how TDD shapes design incrementally rather than requiring you to plan everything upfront.
What Is Test-Driven Development?
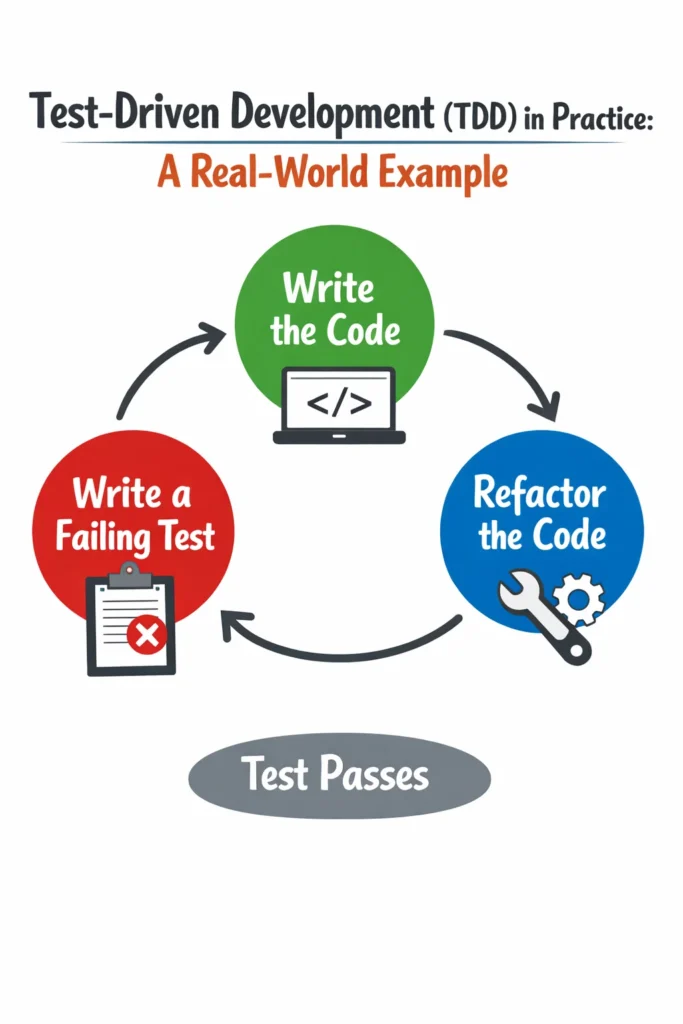
Test-driven development is a software development practice where you write a failing test before writing the production code that makes it pass. The process follows a strict three-step cycle called red-green-refactor. First, you write a test that describes the behavior you want (red — the test fails). Then, you write the minimum code to make that test pass (green). Finally, you improve the code’s structure without changing its behavior (refactor). Each cycle takes minutes, not hours, and the accumulated tests form a comprehensive safety net as the feature grows.
The key insight is that TDD is a design practice disguised as a testing practice. Writing the test first forces you to think about the interface — how your code will be called — before you think about the implementation. As a result, TDD naturally produces code with clear interfaces, small functions, and loose coupling.
The Red-Green-Refactor Cycle
Before diving into the example, here’s how the three steps work in practice:
- Red: Write a test that describes a small piece of behavior. Run it. Watch it fail. The failure confirms the test is actually checking something.
- Green: Write the simplest code that makes the test pass. Don’t optimize, don’t generalize, don’t handle edge cases yet. Just make it green.
- Refactor: Clean up the code you just wrote. Remove duplication, extract functions, improve names. Run the tests after each change to confirm nothing breaks.
Then repeat. Each cycle adds one small behavior. After ten cycles, you have a feature with ten tested behaviors that you built incrementally. For more on how this cycle integrates with clean architecture, see our guide on TDD and clean architecture in Flutter.
Setting Up the Example Project
We’ll build a PriceCalculator service in TypeScript using Jest. This service calculates the total price for a shopping cart, applying percentage discounts, bulk pricing rules, and tax.
# Create project and install dependencies
mkdir tdd-price-calculator && cd tdd-price-calculator
npm init -y
npm install --save-dev typescript jest ts-jest @types/jest

# Initialize TypeScript and Jest configs
npx tsc --init
npx ts-jest config:init
Create the initial file structure:
tdd-price-calculator/
  ├── src/
  │   └── priceCalculator.ts    (will be created during TDD)
  └── tests/
      └── priceCalculator.test.ts
Now we start with an empty test file and no production code. That’s the point — TDD means the tests come first.
Cycle 1: Basic Price Calculation
Red — Write the Failing Test
Start with the simplest possible behavior: calculating the price for a single item.
// tests/priceCalculator.test.ts
import { PriceCalculator } from '../src/priceCalculator';

describe('PriceCalculator', () => {
  let calculator: PriceCalculator;

  beforeEach(() => {
    calculator = new PriceCalculator();
  });

  describe('calculateTotal', () => {
    it('should return the price for a single item', () => {
      const items = [{ name: 'Widget', price: 10.0, quantity: 1 }];

      const total = calculator.calculateTotal(items);

      expect(total).toBe(10.0);
    });
  });
});
Run the test: npx jest. It fails because PriceCalculator doesn’t exist yet. That’s the red phase — a meaningful failure that tells us what to build.
Green — Make It Pass
Write the absolute minimum code to make this test pass.
// src/priceCalculator.ts
interface CartItem {
  name: string;
  price: number;
  quantity: number;
}

export class PriceCalculator {
  calculateTotal(items: CartItem[]): number {
    return items[0].price;
  }
}
This is deliberately naive — it just returns the first item’s price. Run the test: it passes. That’s the green phase. You might think “this is silly, I know I need to multiply by quantity and sum all items.” However, resisting the urge to write ahead is what makes TDD work. The next test will force the correct implementation.
Refactor
Nothing to refactor yet. The code is simple and the test is clear. Move to the next cycle.
Cycle 2: Multiple Items and Quantities
Red
it('should multiply price by quantity', () => {
  const items = [{ name: 'Widget', price: 10.0, quantity: 3 }];

  const total = calculator.calculateTotal(items);

  expect(total).toBe(30.0);
});

it('should sum prices across multiple items', () => {
  const items = [
    { name: 'Widget', price: 10.0, quantity: 2 },
    { name: 'Gadget', price: 25.0, quantity: 1 },
  ];

  const total = calculator.calculateTotal(items);

  expect(total).toBe(45.0);
});
Both tests fail. The first fails because we’re not multiplying by quantity. The second fails because we only look at the first item.
Green
// src/priceCalculator.ts
export class PriceCalculator {
  calculateTotal(items: CartItem[]): number {
    return items.reduce(
      (sum, item) => sum + item.price * item.quantity,
      0
    );
  }
}
All three tests pass. The implementation is now correct for basic price calculation.
Refactor
The code is already clean, but let’s extract the item subtotal calculation for clarity:
// src/priceCalculator.ts
interface CartItem {
  name: string;
  price: number;
  quantity: number;
}

export class PriceCalculator {
  calculateTotal(items: CartItem[]): number {
    return items.reduce(
      (sum, item) => sum + this.itemSubtotal(item),
      0
    );
  }

  private itemSubtotal(item: CartItem): number {
    return item.price * item.quantity;
  }
}
Run the tests again — all pass. The refactor improved readability without changing behavior. This is the rhythm of TDD: small increments with constant feedback.
Cycle 3: Percentage Discounts
Now we add discount support. A percentage discount applies to the entire cart total.
Red
describe('with percentage discount', () => {
  it('should apply a percentage discount to the total', () => {
    const items = [{ name: 'Widget', price: 100.0, quantity: 1 }];

    const total = calculator.calculateTotal(items, {
      type: 'percentage',
      value: 10,
    });

    expect(total).toBe(90.0);
  });

  it('should handle discount on multiple items', () => {
    const items = [
      { name: 'Widget', price: 50.0, quantity: 2 },
      { name: 'Gadget', price: 30.0, quantity: 1 },
    ];

    const total = calculator.calculateTotal(items, {
      type: 'percentage',
      value: 20,
    });

    // Subtotal: 130, 20% off = 104
    expect(total).toBe(104.0);
  });
});
Tests fail because calculateTotal doesn’t accept a second parameter yet.
Green
// src/priceCalculator.ts
interface CartItem {
  name: string;
  price: number;
  quantity: number;
}

interface Discount {
  type: 'percentage';
  value: number;
}

export class PriceCalculator {
  calculateTotal(items: CartItem[], discount?: Discount): number {
    const subtotal = items.reduce(
      (sum, item) => sum + this.itemSubtotal(item),
      0
    );

    if (discount?.type === 'percentage') {
      return subtotal * (1 - discount.value / 100);
    }

    return subtotal;
  }

  private itemSubtotal(item: CartItem): number {
    return item.price * item.quantity;
  }
}
All five tests pass. Notice that the discount parameter is optional, so all previous tests continue to pass without modification.
Refactor
Extract the discount calculation into its own method:
// src/priceCalculator.ts
export class PriceCalculator {
  calculateTotal(items: CartItem[], discount?: Discount): number {
    const subtotal = items.reduce(
      (sum, item) => sum + this.itemSubtotal(item),
      0
    );

    return this.applyDiscount(subtotal, discount);
  }

  private itemSubtotal(item: CartItem): number {
    return item.price * item.quantity;
  }

  private applyDiscount(subtotal: number, discount?: Discount): number {
    if (!discount) return subtotal;

    if (discount.type === 'percentage') {
      return subtotal * (1 - discount.value / 100);
    }

    return subtotal;
  }
}
Tests still pass. The code is now structured so adding new discount types only requires extending applyDiscount.
Cycle 4: Fixed Amount Discounts
Red
it('should apply a fixed amount discount', () => {
  const items = [{ name: 'Widget', price: 100.0, quantity: 1 }];

  const total = calculator.calculateTotal(items, {
    type: 'fixed',
    value: 15,
  });

  expect(total).toBe(85.0);
});
This fails because the Discount type only accepts 'percentage'.
Green
Update the type and add the logic:
// Update the Discount interface
interface Discount {
  type: 'percentage' | 'fixed';
  value: number;
}

// Update applyDiscount
private applyDiscount(subtotal: number, discount?: Discount): number {
  if (!discount) return subtotal;

  if (discount.type === 'percentage') {
    return subtotal * (1 - discount.value / 100);
  }

  if (discount.type === 'fixed') {
    return subtotal - discount.value;
  }

  return subtotal;
}
All six tests pass. Because we extracted applyDiscount during the previous refactor, adding a new discount type was straightforward — TDD’s design pressure paid off.
Cycle 5: Edge Cases and Rounding
Edge cases are where TDD shines brightest. Without tests, edge cases get discovered in production. With TDD, you think about them deliberately.
Red
describe('edge cases', () => {
  it('should return 0 for an empty cart', () => {
    const total = calculator.calculateTotal([]);

    expect(total).toBe(0);
  });

  it('should not allow total to go below zero with fixed discount', () => {
    const items = [{ name: 'Widget', price: 10.0, quantity: 1 }];

    const total = calculator.calculateTotal(items, {
      type: 'fixed',
      value: 25,
    });

    expect(total).toBe(0);
  });

  it('should round to two decimal places', () => {
    const items = [{ name: 'Widget', price: 9.99, quantity: 3 }];

    const total = calculator.calculateTotal(items, {
      type: 'percentage',
      value: 15,
    });

    // 9.99 * 3 = 29.97, 15% off = 25.4745, rounded = 25.47
    expect(total).toBe(25.47);
  });
});
The empty cart test passes already (our reduce starts at 0). The negative total test and rounding test fail.
Green
private applyDiscount(subtotal: number, discount?: Discount): number {
  if (!discount) return this.round(subtotal);

  let total = subtotal;

  if (discount.type === 'percentage') {
    total = subtotal * (1 - discount.value / 100);
  }

  if (discount.type === 'fixed') {
    total = subtotal - discount.value;
  }

  // Ensure total never goes below zero
  return this.round(Math.max(0, total));
}

private round(value: number): number {
  return Math.round(value * 100) / 100;
}
All nine tests pass. Each edge case is documented by a test, so future developers know exactly how the calculator handles these situations.
Cycle 6: Tax Calculation
The final feature: applying tax after discounts.
Red
describe('with tax', () => {
  it('should apply tax rate to the discounted total', () => {
    const items = [{ name: 'Widget', price: 100.0, quantity: 1 }];

    const total = calculator.calculateTotal(
      items,
      { type: 'percentage', value: 10 },
      { taxRate: 8.5 }
    );

    // Subtotal: 100, 10% discount = 90, 8.5% tax = 97.65
    expect(total).toBe(97.65);
  });

  it('should apply tax without a discount', () => {
    const items = [{ name: 'Widget', price: 50.0, quantity: 2 }];

    const total = calculator.calculateTotal(items, undefined, {
      taxRate: 10,
    });

    // Subtotal: 100, 10% tax = 110
    expect(total).toBe(110.0);
  });
});
Green
// src/priceCalculator.ts — final implementation
interface CartItem {
  name: string;
  price: number;
  quantity: number;
}

interface Discount {
  type: 'percentage' | 'fixed';
  value: number;
}

interface TaxConfig {
  taxRate: number;
}

export class PriceCalculator {
  calculateTotal(
    items: CartItem[],
    discount?: Discount,
    tax?: TaxConfig
  ): number {
    const subtotal = items.reduce(
      (sum, item) => sum + this.itemSubtotal(item),
      0
    );

    const discountedTotal = this.applyDiscount(subtotal, discount);
    return this.applyTax(discountedTotal, tax);
  }

  private itemSubtotal(item: CartItem): number {
    return item.price * item.quantity;
  }

  private applyDiscount(subtotal: number, discount?: Discount): number {
    if (!discount) return subtotal;

    let total = subtotal;

    if (discount.type === 'percentage') {
      total = subtotal * (1 - discount.value / 100);
    }

    if (discount.type === 'fixed') {
      total = subtotal - discount.value;
    }

    return Math.max(0, total);
  }

  private applyTax(total: number, tax?: TaxConfig): number {
    if (!tax) return this.round(total);

    return this.round(total * (1 + tax.taxRate / 100));
  }

  private round(value: number): number {
    return Math.round(value * 100) / 100;
  }
}
All eleven tests pass. The final implementation emerged naturally from six TDD cycles. Notice that we never planned the internal structure upfront — the itemSubtotal, applyDiscount, applyTax, and round methods all emerged during refactoring steps. This is TDD’s design benefit in action.
What TDD Revealed About the Design
Looking back at the six cycles, TDD influenced several design decisions that might not have been obvious upfront:
Separation of concerns emerged naturally. The discount logic, tax logic, and rounding logic each landed in separate methods — not because we planned it, but because refactoring after each green phase pushed us toward cleaner separation.
The interface was consumer-driven. We designed calculateTotal based on how we wanted to call it in tests, not based on internal implementation details. This produced an API that’s intuitive for callers.
Edge cases were handled early. The negative-total and rounding tests came naturally as we thought about what could go wrong. Without TDD, these edge cases typically get discovered in production weeks later.
Each method does one thing. Because each cycle added one behavior, the code grew in small, focused increments. There was never a temptation to write a 50-line method because each addition was just a few lines. For more on writing clean, focused code, see our guide on clean code practices.
Real-World Scenario: Adopting TDD on an Existing Codebase
Consider a team of four developers maintaining a mid-sized Express API with minimal test coverage. The team decides to try TDD, but applying it to existing code feels impractical — the functions are tightly coupled, dependencies are hard to mock, and writing tests for existing code feels like retroactive documentation rather than design guidance.
Instead of retrofitting TDD everywhere, they adopt a practical rule: use TDD for all new features and bug fixes, but don’t rewrite existing code just to add tests. When a bug report comes in, the developer writes a failing test that reproduces the bug first, then fixes the code to make the test pass. When a new feature is requested, the developer starts with tests before writing any implementation.
After three months, roughly 40% of the codebase has test coverage from new features and bug fixes. The TDD-written code is noticeably easier to test and maintain than the legacy code because the test-first approach forced smaller functions, explicit dependencies, and clear interfaces. The key trade-off is speed — the first few weeks feel slower because developers are learning to think test-first. However, the time saved on debugging and regressions more than compensates within the first month.
The important lesson is that TDD doesn’t require rewriting your entire codebase. Starting with new code and bug fixes gives you the benefits incrementally without the risk of a large-scale refactor. For structuring your project to support testable code, see our guide on scalable Express.js project structure.
When to Use Test-Driven Development in Practice
- You’re building business logic with clear input-output relationships, like pricing rules, validation logic, or data transformations
- You want to design APIs and interfaces from the consumer’s perspective before committing to an implementation
- You’re working on a feature where edge cases and error handling are critical to correctness
- You need to fix a bug and want to ensure it stays fixed — write the failing test first, then fix the code
- Your team struggles with writing tests after the fact because the code ends up hard to test
When NOT to Use TDD
- You’re prototyping or exploring an unfamiliar API where the interface will change rapidly — write the code first, then add tests once the approach stabilizes
- The code is primarily glue or configuration (wiring up routes, setting up middleware) with no meaningful logic to test in isolation
- You’re writing UI components where visual output is the primary concern — visual regression testing tools like Percy or Chromatic are more appropriate than unit tests
- The test would require extensive mocking of infrastructure that makes the test harder to understand than the production code itself
Common Mistakes with Test-Driven Development
- Writing too many tests in the red phase. TDD works best with one test at a time. Writing five failing tests at once creates pressure to write a large chunk of code, which defeats the incremental design benefit.
- Skipping the refactor step. The refactor phase is where TDD improves your design. If you only do red-green-red-green, you accumulate messy code with good test coverage — which is better than no tests, but misses half the value.
- Writing tests that are too specific about implementation. Test the what, not the how. If your test breaks when you rename a private method, it’s testing implementation details. Focus assertions on the return values and observable side effects.
- Testing trivial code. Getters, setters, and simple data classes don’t benefit from TDD. Apply TDD to code that contains decisions, calculations, or coordination logic where bugs actually hide.
- Giving up after the first week. TDD feels slower initially because you’re building a new habit. The productivity gains appear after two to three weeks when you start debugging less and refactoring with confidence. Give it a genuine trial before judging.
- Not running tests after every change. The feedback loop is the core of TDD. If you write ten lines of code before running tests, you’ve lost the incremental safety that makes TDD effective. Run tests after every small change — modern test runners with watch mode make this nearly instantaneous.
Conclusion
Test-driven development in practice is about building features incrementally through small red-green-refactor cycles. Each cycle adds one behavior, and the accumulated tests give you confidence to refactor aggressively. The pricing calculator example demonstrates how TDD shapes design naturally — separation of concerns, clean interfaces, and edge case coverage all emerged from the process rather than upfront planning.
Start by applying TDD to your next bug fix: write a test that reproduces the bug, fix the code, and verify the test passes. Once that feels natural, try TDD for a new feature. For your next step, explore our guide on unit testing with Jest and Vitest for framework-specific patterns that complement TDD, or learn how Testcontainers can extend your TDD workflow to include database-backed tests.