Building a Flutter app that survives beyond version 1.0 requires architectural decisions that pay dividends over time. Flutter clean architecture combined with dependency injection creates applications that remain testable, maintainable, and adaptable as requirements evolve. These aren’t academic concepts—they’re practical tools that solve real problems in production codebases.
This guide explains how clean architecture and dependency injection complement each other in Flutter applications. You’ll understand the reasoning behind each pattern, see complete implementation examples, and learn when this approach makes sense for your projects. By the end, you’ll have a blueprint for structuring Flutter apps that scale gracefully.
Understanding Clean Architecture in Flutter
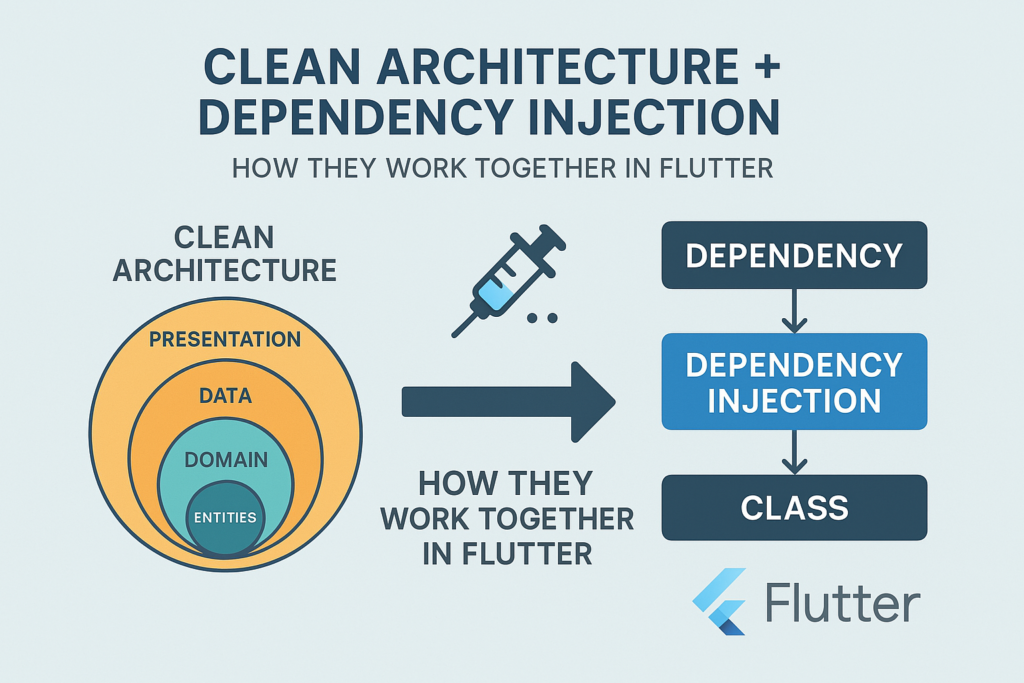
Clean Architecture, formalized by Robert C. Martin, organizes code into concentric layers with strict dependency rules. The core principle is simple: inner layers know nothing about outer layers. Business logic doesn’t know about databases. Use cases don’t know about UI frameworks. This separation creates code that’s resilient to change.
The Three Essential Layers
In Flutter clean architecture, we typically work with three layers:
Domain Layer (innermost): Contains business entities, use cases, and repository interfaces. This layer is pure Dart with no Flutter dependencies. It defines what your application does.
Data Layer: Implements repository interfaces from the domain layer. Contains data sources (APIs, databases), models, and mappers. This layer handles how data is fetched and stored.
Presentation Layer (outermost): Contains widgets, screens, and state management (BLoC, Riverpod, etc.). This layer handles how users interact with the application.
The Dependency Rule
Dependencies point inward only. The presentation layer depends on the domain layer. The data layer depends on the domain layer. The domain layer depends on nothing else in your application.
// Domain layer - pure Dart, no external dependencies
abstract class UserRepository {
  Future<User> getUser(String id);
  Future<void> updateUser(User user);
}

class User {
  final String id;
  final String name;
  final String email;

  const User({required this.id, required this.name, required this.email});
}

// Use case - orchestrates business logic
class GetUserProfile {
  final UserRepository _repository;

  GetUserProfile(this._repository);

  Future<User> execute(String userId) {
    return _repository.getUser(userId);
  }
}
Notice that GetUserProfile depends on UserRepository, an abstract interface. It doesn’t know whether users come from an API, database, or mock data. This abstraction is what makes the architecture flexible.
Understanding Dependency Injection
Dependency Injection is a technique where objects receive their dependencies from external sources rather than creating them internally. Instead of a class instantiating its collaborators, they’re “injected” from outside.
Code Without Dependency Injection
// Tightly coupled - hard to test, hard to change
class UserBloc {
  final _repository = UserRepositoryImpl(
    ApiClient(
      HttpClient(),
      AuthService(),
    ),
  );

  Future<User> loadUser(String id) {
    return _repository.getUser(id);
  }
}
This code creates its own dependencies. Testing requires real API calls. Changing the HTTP client requires modifying UserBloc. Every dependency change cascades through the codebase.
Code With Dependency Injection
// Loosely coupled - testable, flexible
class UserBloc {
  final UserRepository _repository;

  UserBloc(this._repository);

  Future<User> loadUser(String id) {
    return _repository.getUser(id);
  }
}

// In tests
final bloc = UserBloc(MockUserRepository());

// In production
final bloc = UserBloc(UserRepositoryImpl(apiClient));
Now UserBloc receives its repository from outside. Tests can inject mocks. Production code can inject real implementations. The class doesn’t care where its dependencies come from.
How Clean Architecture and DI Work Together
Clean Architecture defines the boundaries between layers. Dependency injection bridges those boundaries without creating coupling. Together, they solve the fundamental tension between separation and connection.
The Connection Problem
Consider a typical Flutter feature: displaying a user profile. The screen needs a BLoC. The BLoC needs a use case. The use case needs a repository. The repository needs an API client. Without dependency injection, you’d write code like this:
// Without DI - violates clean architecture principles
class UserProfileScreen extends StatelessWidget {
  @override
  Widget build(BuildContext context) {
    // Screen creates everything - massive coupling
    final apiClient = ApiClient(baseUrl: 'https://api.example.com');
    final repository = UserRepositoryImpl(apiClient);
    final useCase = GetUserProfile(repository);
    final bloc = UserProfileBloc(useCase);

    return BlocProvider(
      create: (_) => bloc,
      child: UserProfileContent(),
    );
  }
}
This violates clean architecture. The presentation layer now knows about data layer implementation details. Changing the API client requires modifying UI code.
Dependency Injection as the Bridge
// With DI - clean separation maintained
class UserProfileScreen extends StatelessWidget {
  @override
  Widget build(BuildContext context) {
    return BlocProvider(
      create: (_) => getIt<UserProfileBloc>(),
      child: UserProfileContent(),
    );
  }
}
The screen doesn’t know how UserProfileBloc is constructed. It asks the DI container for an instance. The container handles all the wiring, keeping layers properly separated.
Implementing DI with GetIt and Injectable
GetIt is a service locator for Dart. Injectable generates the registration code, reducing boilerplate. Together, they provide a practical DI solution for Flutter clean architecture.
Project Setup
Add the dependencies to your pubspec.yaml:
dependencies:
  get_it: ^7.6.0
  injectable: ^2.3.0

dev_dependencies:
  build_runner: ^2.4.0
  injectable_generator: ^2.3.0
Configuring the Injection Container
Create an injection configuration file:
// lib/injection.dart
import 'package:get_it/get_it.dart';
import 'package:injectable/injectable.dart';

import 'injection.config.dart';

final getIt = GetIt.instance;

@InjectableInit(
  initializerName: 'init',
  preferRelativeImports: true,
  asExtension: true,
)
void configureDependencies() => getIt.init();
Call configureDependencies() in your main() function before runApp():
void main() {
  configureDependencies();
  runApp(const MyApp());
}
Annotating Classes for Injection
Mark classes with annotations to register them with GetIt:
// Data layer
@lazySingleton
class ApiClient {
  final String baseUrl;

  ApiClient(@Named('baseUrl') this.baseUrl);

  Future<Map<String, dynamic>> get(String endpoint) async {
    // HTTP implementation
  }
}

@LazySingleton(as: UserRepository)
class UserRepositoryImpl implements UserRepository {
  final ApiClient _client;

  UserRepositoryImpl(this._client);

  @override
  Future<User> getUser(String id) async {
    final data = await _client.get('/users/$id');
    return UserModel.fromJson(data).toEntity();
  }

  @override
  Future<void> updateUser(User user) async {
    await _client.put('/users/${user.id}', body: user.toJson());
  }
}

// Domain layer use cases
@injectable
class GetUserProfile {
  final UserRepository _repository;

  GetUserProfile(this._repository);

  Future<User> execute(String userId) {
    return _repository.getUser(userId);
  }
}

@injectable
class UpdateUserProfile {
  final UserRepository _repository;

  UpdateUserProfile(this._repository);

  Future<void> execute(User user) {
    return _repository.updateUser(user);
  }
}

// Presentation layer
@injectable
class UserProfileBloc extends Cubit<UserProfileState> {
  final GetUserProfile _getUserProfile;
  final UpdateUserProfile _updateUserProfile;

  UserProfileBloc(this._getUserProfile, this._updateUserProfile)
      : super(UserProfileInitial());

  Future<void> loadProfile(String userId) async {
    emit(UserProfileLoading());
    try {
      final user = await _getUserProfile.execute(userId);
      emit(UserProfileLoaded(user));
    } catch (e) {
      emit(UserProfileError(e.toString()));
    }
  }
}
Run the code generator to create the registration code:
flutter pub run build_runner build --delete-conflicting-outputsUnderstanding Registration Types
@injectable: Creates a new instance each time it’s requested. Use for stateful objects like BLoCs.
@lazySingleton: Creates one instance on first request, reuses it afterward. Use for stateless services like repositories.
@singleton: Creates one instance immediately at startup. Use for critical services that must initialize early.
// New instance each time
@injectable
class UserProfileBloc { }

// Single shared instance, created on demand
@lazySingleton
class AuthService { }

// Single instance, created at startup
@singleton
class AnalyticsService { }
Recommended Project Structure
A well-organized folder structure makes clean architecture visible in your codebase:
lib/
├── core/
│   ├── error/
│   │   ├── exceptions.dart
│   │   └── failures.dart
│   ├── network/
│   │   └── api_client.dart
│   └── utils/
│       └── constants.dart
├── features/
│   └── user_profile/
│       ├── data/
│       │   ├── datasources/
│       │   │   └── user_remote_datasource.dart
│       │   ├── models/
│       │   │   └── user_model.dart
│       │   └── repositories/
│       │       └── user_repository_impl.dart
│       ├── domain/
│       │   ├── entities/
│       │   │   └── user.dart
│       │   ├── repositories/
│       │   │   └── user_repository.dart
│       │   └── usecases/
│       │       ├── get_user_profile.dart
│       │       └── update_user_profile.dart
│       └── presentation/
│           ├── bloc/
│           │   ├── user_profile_bloc.dart
│           │   ├── user_profile_event.dart
│           │   └── user_profile_state.dart
│           ├── pages/
│           │   └── user_profile_page.dart
│           └── widgets/
│               └── user_avatar.dart
├── injection.dart
└── main.dart
This feature-based structure keeps related code together while maintaining layer separation within each feature.
Testing with Clean Architecture and DI
The primary benefit of this architecture is testability. Each layer can be tested in isolation with mocked dependencies.
Testing Use Cases
class MockUserRepository extends Mock implements UserRepository {}

void main() {
  late GetUserProfile useCase;
  late MockUserRepository mockRepository;

  setUp(() {
    mockRepository = MockUserRepository();
    useCase = GetUserProfile(mockRepository);
  });

  test('should get user from repository', () async {
    final testUser = User(id: '1', name: 'Test', email: 'test@test.com');
    when(() => mockRepository.getUser('1')).thenAnswer((_) async => testUser);

    final result = await useCase.execute('1');

    expect(result, testUser);
    verify(() => mockRepository.getUser('1')).called(1);
  });
}
Testing BLoCs
class MockGetUserProfile extends Mock implements GetUserProfile {}
class MockUpdateUserProfile extends Mock implements UpdateUserProfile {}

void main() {
  late UserProfileBloc bloc;
  late MockGetUserProfile mockGetUserProfile;
  late MockUpdateUserProfile mockUpdateUserProfile;

  setUp(() {
    mockGetUserProfile = MockGetUserProfile();
    mockUpdateUserProfile = MockUpdateUserProfile();
    bloc = UserProfileBloc(mockGetUserProfile, mockUpdateUserProfile);
  });

  blocTest<UserProfileBloc, UserProfileState>(
    'emits [Loading, Loaded] when loadProfile succeeds',
    build: () {
      when(() => mockGetUserProfile.execute(any()))
          .thenAnswer((_) async => testUser);
      return bloc;
    },
    act: (bloc) => bloc.loadProfile('1'),
    expect: () => [
      UserProfileLoading(),
      UserProfileLoaded(testUser),
    ],
  );
}
Configuring Different Environments
Injectable supports environment-specific registrations, useful for development, staging, and production configurations:
// Register different implementations per environment
@LazySingleton(as: ApiClient, env: [Environment.prod])
class ProductionApiClient implements ApiClient {
  // Real API implementation
}

@LazySingleton(as: ApiClient, env: [Environment.dev])
class DevelopmentApiClient implements ApiClient {
  // Mock or staging API
}

// Configure environment at startup
void main() {
  configureDependencies(environment: Environment.prod);
  runApp(const MyApp());
}
Common Pitfalls to Avoid
Several mistakes can undermine your clean architecture implementation:
Leaking data layer details into domain: Domain entities should not have JSON annotations or database-specific fields. Create separate models in the data layer and map them to entities.
Overusing singletons: Not everything should be a singleton. BLoCs typically need fresh instances. Use @injectable for stateful objects.
Circular dependencies: If Injectable fails to generate code, you likely have circular dependencies. Refactor to break the cycle, often by introducing an interface.
Accessing GetIt in widgets directly: Prefer using BlocProvider or similar patterns rather than calling getIt<T>() throughout your widget tree.
When to Use This Architecture
Flutter clean architecture with dependency injection isn’t always necessary. Consider it when:
- Your app has more than 3-4 features
- Multiple developers work on the codebase
- You need comprehensive test coverage
- The app will be maintained for years
- Business logic is complex or will grow
For simple apps or prototypes, this architecture adds unnecessary complexity. Start simple and refactor toward clean architecture as the app grows.
Building Maintainable Flutter Applications
Clean architecture provides the boundaries. Dependency injection provides the connections. Together, they create Flutter applications that remain maintainable as they grow. The initial setup investment pays off through easier testing, simpler refactoring, and clearer code organization.
Start by implementing this architecture in one feature. Once you’re comfortable with the patterns, expand to the rest of your application. The structure becomes intuitive with practice, and you’ll find yourself naturally thinking in layers.
For related patterns, explore our guides on Riverpod vs BLoC for state management choices and Flutter testing best practices to maximize the testability benefits of clean architecture.
6 Comments