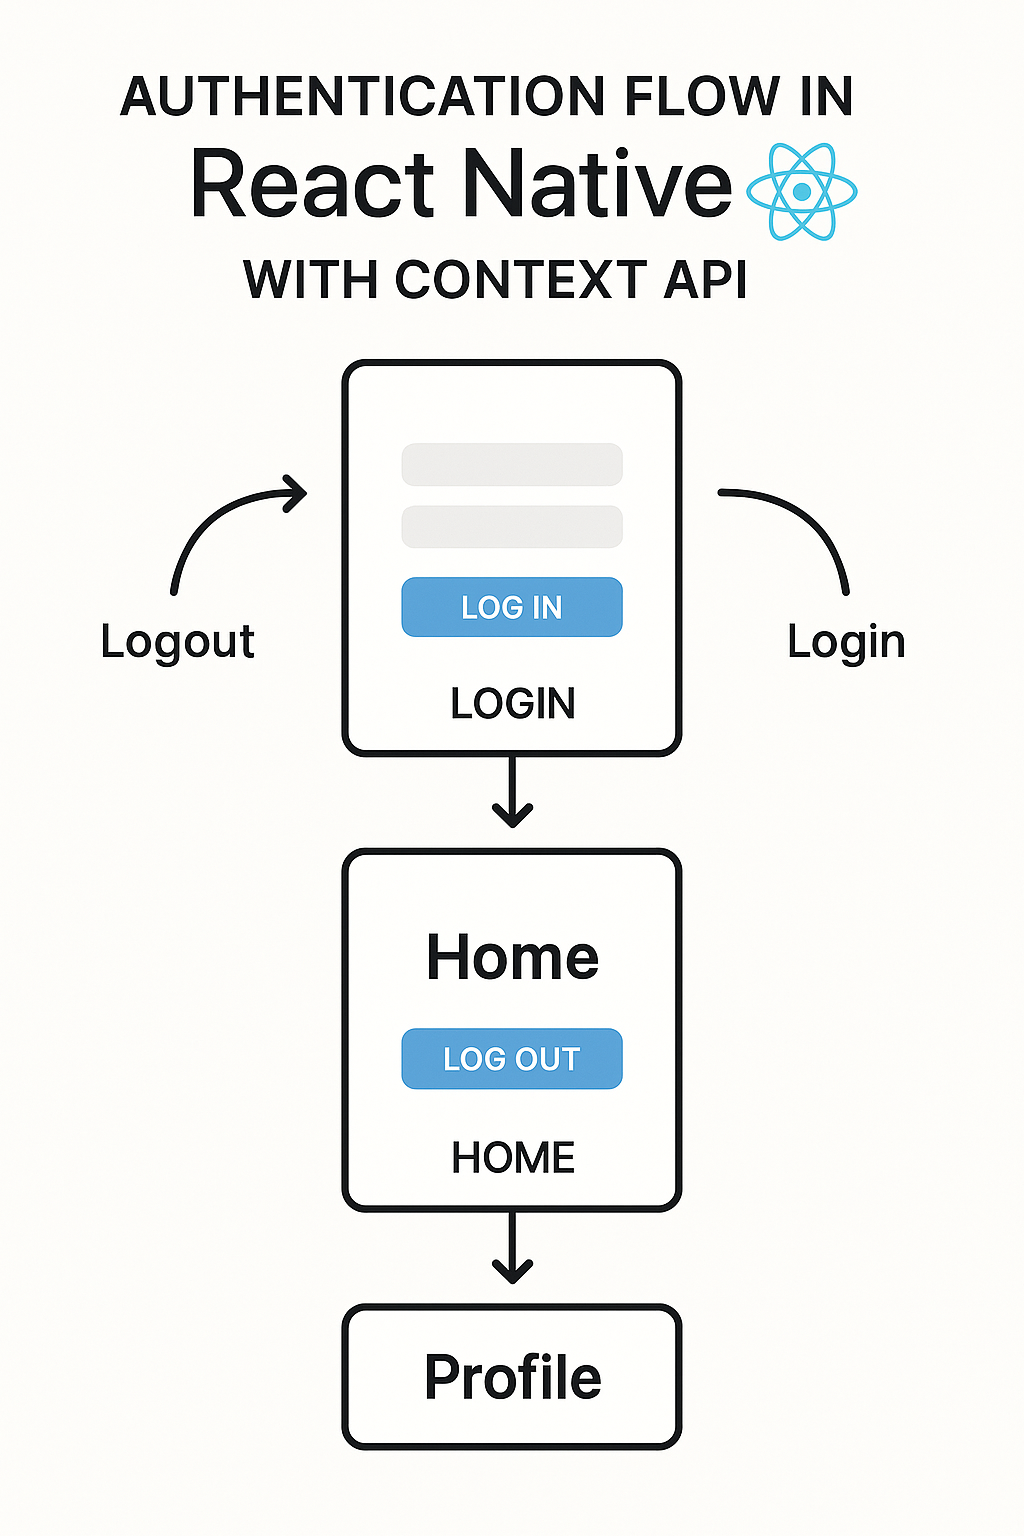
Managing user authentication is essential in almost every mobile app. While libraries like Redux or Zustand are popular for state management, the built-in Context API provides everything you need for handling authentication flows in React Native. In this comprehensive guide, you’ll learn how to implement a production-ready authentication system with secure token storage, automatic token refresh, API integration, and protected navigation—all using React’s native capabilities.
Why Use Context API for Auth?
The Context API is ideal for authentication state because:
- Built into React – No additional packages or bundle size
- Global accessibility – Auth state available anywhere in your component tree
- Hooks integration – Works seamlessly with
useContext,useReducer, anduseEffect - Type safety – Full TypeScript support for better developer experience
- Testability – Easy to mock and test auth state in isolation
For more on React’s Context API, see the official React documentation.
Project Structure
We’ll organize our code using a feature-first structure:
/src
  /auth
    AuthContext.tsx       # Context provider and hooks
    authReducer.ts        # State management logic
    authService.ts        # API calls
    authTypes.ts          # TypeScript interfaces
  /screens
    LoginScreen.tsx
    RegisterScreen.tsx
    HomeScreen.tsx
    ProfileScreen.tsx
  /navigation
    AppNavigator.tsx
    AuthNavigator.tsx
  /components
    LoadingScreen.tsx
    FormInput.tsx
  /utils
    storage.ts            # Secure storage utilities
    api.ts                # Axios instance with interceptors
Type Definitions
Start by defining TypeScript interfaces for type safety:
// src/auth/authTypes.ts
export interface User {
  id: string;
  email: string;
  name: string;
  avatar?: string;
  createdAt: string;
}

export interface AuthTokens {
  accessToken: string;
  refreshToken: string;
  expiresAt: number;
}

export interface AuthState {
  isAuthenticated: boolean;
  isLoading: boolean;
  user: User | null;
  tokens: AuthTokens | null;
  error: string | null;
}

export type AuthAction =
  | { type: 'AUTH_START' }
  | { type: 'AUTH_SUCCESS'; payload: { user: User; tokens: AuthTokens } }
  | { type: 'AUTH_FAILURE'; payload: string }
  | { type: 'LOGOUT' }
  | { type: 'RESTORE_TOKEN'; payload: { user: User; tokens: AuthTokens } }
  | { type: 'UPDATE_USER'; payload: User }
  | { type: 'REFRESH_TOKENS'; payload: AuthTokens };

export interface AuthContextType extends AuthState {
  login: (email: string, password: string) => Promise<void>;
  register: (name: string, email: string, password: string) => Promise<void>;
  logout: () => Promise<void>;
  updateProfile: (updates: Partial<User>) => Promise<void>;
}

export interface LoginRequest {
  email: string;
  password: string;
}

export interface RegisterRequest {
  name: string;
  email: string;
  password: string;
}

export interface AuthResponse {
  user: User;
  accessToken: string;
  refreshToken: string;
  expiresIn: number;
}
Secure Storage Utilities
Use secure storage for sensitive data like tokens. Never store tokens in plain AsyncStorage:
// src/utils/storage.ts
import * as SecureStore from 'expo-secure-store';
import AsyncStorage from '@react-native-async-storage/async-storage';
import { Platform } from 'react-native';
import { AuthTokens, User } from '../auth/authTypes';

const TOKENS_KEY = 'auth_tokens';
const USER_KEY = 'auth_user';

// Use SecureStore on mobile, AsyncStorage on web (with encryption in production)
const secureStorage = {
  async setItem(key: string, value: string): Promise<void> {
    if (Platform.OS === 'web') {
      await AsyncStorage.setItem(key, value);
    } else {
      await SecureStore.setItemAsync(key, value);
    }
  },

  async getItem(key: string): Promise<string | null> {
    if (Platform.OS === 'web') {
      return AsyncStorage.getItem(key);
    }
    return SecureStore.getItemAsync(key);
  },

  async removeItem(key: string): Promise<void> {
    if (Platform.OS === 'web') {
      await AsyncStorage.removeItem(key);
    } else {
      await SecureStore.deleteItemAsync(key);
    }
  },
};

export const tokenStorage = {
  async saveTokens(tokens: AuthTokens): Promise<void> {
    await secureStorage.setItem(TOKENS_KEY, JSON.stringify(tokens));
  },

  async getTokens(): Promise<AuthTokens | null> {
    const data = await secureStorage.getItem(TOKENS_KEY);
    return data ? JSON.parse(data) : null;
  },

  async clearTokens(): Promise<void> {
    await secureStorage.removeItem(TOKENS_KEY);
  },
};

export const userStorage = {
  async saveUser(user: User): Promise<void> {
    await AsyncStorage.setItem(USER_KEY, JSON.stringify(user));
  },

  async getUser(): Promise<User | null> {
    const data = await AsyncStorage.getItem(USER_KEY);
    return data ? JSON.parse(data) : null;
  },

  async clearUser(): Promise<void> {
    await AsyncStorage.removeItem(USER_KEY);
  },
};

export const clearAllAuthData = async (): Promise<void> => {
  await Promise.all([
    tokenStorage.clearTokens(),
    userStorage.clearUser(),
  ]);
};
API Service with Interceptors
Create an Axios instance with automatic token refresh:
// src/utils/api.ts
import axios, { AxiosError, InternalAxiosRequestConfig } from 'axios';
import { tokenStorage } from './storage';

const API_URL = 'https://api.yourapp.com';

export const api = axios.create({
  baseURL: API_URL,
  timeout: 10000,
  headers: {
    'Content-Type': 'application/json',
  },
});

let isRefreshing = false;
let failedQueue: Array<{
  resolve: (token: string) => void;
  reject: (error: Error) => void;
}> = [];

const processQueue = (error: Error | null, token: string | null) => {
  failedQueue.forEach((promise) => {
    if (error) {
      promise.reject(error);
    } else {
      promise.resolve(token!);
    }
  });
  failedQueue = [];
};

// Request interceptor - attach access token
api.interceptors.request.use(
  async (config: InternalAxiosRequestConfig) => {
    const tokens = await tokenStorage.getTokens();
    if (tokens?.accessToken) {
      config.headers.Authorization = `Bearer ${tokens.accessToken}`;
    }
    return config;
  },
  (error) => Promise.reject(error)
);

// Response interceptor - handle token refresh
api.interceptors.response.use(
  (response) => response,
  async (error: AxiosError) => {
    const originalRequest = error.config as InternalAxiosRequestConfig & { _retry?: boolean };

    // If 401 and not already retrying
    if (error.response?.status === 401 && !originalRequest._retry) {
      if (isRefreshing) {
        // Queue the request while refresh is in progress
        return new Promise((resolve, reject) => {
          failedQueue.push({
            resolve: (token: string) => {
              originalRequest.headers.Authorization = `Bearer ${token}`;
              resolve(api(originalRequest));
            },
            reject: (err: Error) => reject(err),
          });
        });
      }

      originalRequest._retry = true;
      isRefreshing = true;

      try {
        const tokens = await tokenStorage.getTokens();
        if (!tokens?.refreshToken) {
          throw new Error('No refresh token');
        }

        const response = await axios.post(`${API_URL}/auth/refresh`, {
          refreshToken: tokens.refreshToken,
        });

        const newTokens = {
          accessToken: response.data.accessToken,
          refreshToken: response.data.refreshToken,
          expiresAt: Date.now() + response.data.expiresIn * 1000,
        };

        await tokenStorage.saveTokens(newTokens);
        processQueue(null, newTokens.accessToken);

        originalRequest.headers.Authorization = `Bearer ${newTokens.accessToken}`;
        return api(originalRequest);
      } catch (refreshError) {
        processQueue(refreshError as Error, null);
        await tokenStorage.clearTokens();
        // Navigate to login - handled by auth context
        return Promise.reject(refreshError);
      } finally {
        isRefreshing = false;
      }
    }

    return Promise.reject(error);
  }
);
Authentication Service
Create API methods for authentication:
// src/auth/authService.ts
import { api } from '../utils/api';
import {
  AuthResponse,
  LoginRequest,
  RegisterRequest,
  User,
} from './authTypes';

export const authService = {
  async login(credentials: LoginRequest): Promise<AuthResponse> {
    const response = await api.post<AuthResponse>('/auth/login', credentials);
    return response.data;
  },

  async register(data: RegisterRequest): Promise<AuthResponse> {
    const response = await api.post<AuthResponse>('/auth/register', data);
    return response.data;
  },

  async logout(refreshToken: string): Promise<void> {
    await api.post('/auth/logout', { refreshToken });
  },

  async getCurrentUser(): Promise<User> {
    const response = await api.get<User>('/auth/me');
    return response.data;
  },

  async updateProfile(updates: Partial<User>): Promise<User> {
    const response = await api.patch<User>('/auth/profile', updates);
    return response.data;
  },

  async refreshTokens(refreshToken: string): Promise<AuthResponse> {
    const response = await api.post<AuthResponse>('/auth/refresh', {
      refreshToken,
    });
    return response.data;
  },

  async forgotPassword(email: string): Promise<void> {
    await api.post('/auth/forgot-password', { email });
  },

  async resetPassword(token: string, password: string): Promise<void> {
    await api.post('/auth/reset-password', { token, password });
  },
};
Auth Reducer
Implement the reducer for predictable state updates:
// src/auth/authReducer.ts
import { AuthState, AuthAction } from './authTypes';

export const initialState: AuthState = {
  isAuthenticated: false,
  isLoading: true, // Start with loading to check stored tokens
  user: null,
  tokens: null,
  error: null,
};

export function authReducer(state: AuthState, action: AuthAction): AuthState {
  switch (action.type) {
    case 'AUTH_START':
      return {
        ...state,
        isLoading: true,
        error: null,
      };

    case 'AUTH_SUCCESS':
      return {
        ...state,
        isAuthenticated: true,
        isLoading: false,
        user: action.payload.user,
        tokens: action.payload.tokens,
        error: null,
      };

    case 'AUTH_FAILURE':
      return {
        ...state,
        isAuthenticated: false,
        isLoading: false,
        user: null,
        tokens: null,
        error: action.payload,
      };

    case 'LOGOUT':
      return {
        ...initialState,
        isLoading: false,
      };

    case 'RESTORE_TOKEN':
      return {
        ...state,
        isAuthenticated: true,
        isLoading: false,
        user: action.payload.user,
        tokens: action.payload.tokens,
      };

    case 'UPDATE_USER':
      return {
        ...state,
        user: action.payload,
      };

    case 'REFRESH_TOKENS':
      return {
        ...state,
        tokens: action.payload,
      };

    default:
      return state;
  }
}
Auth Context Provider
Implement the main context provider with all authentication logic:
// src/auth/AuthContext.tsx
import React, {
  createContext,
  useContext,
  useReducer,
  useEffect,
  useCallback,
  useMemo,
} from 'react';
import { authReducer, initialState } from './authReducer';
import { authService } from './authService';
import { tokenStorage, userStorage, clearAllAuthData } from '../utils/storage';
import { AuthContextType, AuthTokens } from './authTypes';

const AuthContext = createContext<AuthContextType | undefined>(undefined);

export const AuthProvider: React.FC<{ children: React.ReactNode }> = ({
  children,
}) => {
  const [state, dispatch] = useReducer(authReducer, initialState);

  // Restore authentication state on app start
  useEffect(() => {
    const restoreAuthState = async () => {
      try {
        const [tokens, user] = await Promise.all([
          tokenStorage.getTokens(),
          userStorage.getUser(),
        ]);

        if (tokens && user) {
          // Check if token is expired
          if (tokens.expiresAt > Date.now()) {
            dispatch({ type: 'RESTORE_TOKEN', payload: { user, tokens } });
          } else {
            // Try to refresh
            try {
              const response = await authService.refreshTokens(tokens.refreshToken);
              const newTokens: AuthTokens = {
                accessToken: response.accessToken,
                refreshToken: response.refreshToken,
                expiresAt: Date.now() + 3600 * 1000, // 1 hour
              };
              await tokenStorage.saveTokens(newTokens);
              dispatch({ type: 'RESTORE_TOKEN', payload: { user: response.user, tokens: newTokens } });
            } catch {
              await clearAllAuthData();
              dispatch({ type: 'LOGOUT' });
            }
          }
        } else {
          dispatch({ type: 'LOGOUT' });
        }
      } catch (error) {
        console.error('Failed to restore auth state:', error);
        dispatch({ type: 'LOGOUT' });
      }
    };

    restoreAuthState();
  }, []);

  const login = useCallback(async (email: string, password: string) => {
    dispatch({ type: 'AUTH_START' });

    try {
      const response = await authService.login({ email, password });

      const tokens: AuthTokens = {
        accessToken: response.accessToken,
        refreshToken: response.refreshToken,
        expiresAt: Date.now() + 3600 * 1000,
      };

      await Promise.all([
        tokenStorage.saveTokens(tokens),
        userStorage.saveUser(response.user),
      ]);

      dispatch({
        type: 'AUTH_SUCCESS',
        payload: { user: response.user, tokens },
      });
    } catch (error: any) {
      const message = error.response?.data?.message || 'Login failed';
      dispatch({ type: 'AUTH_FAILURE', payload: message });
      throw new Error(message);
    }
  }, []);

  const register = useCallback(
    async (name: string, email: string, password: string) => {
      dispatch({ type: 'AUTH_START' });

      try {
        const response = await authService.register({ name, email, password });

        const tokens: AuthTokens = {
          accessToken: response.accessToken,
          refreshToken: response.refreshToken,
          expiresAt: Date.now() + 3600 * 1000,
        };

        await Promise.all([
          tokenStorage.saveTokens(tokens),
          userStorage.saveUser(response.user),
        ]);

        dispatch({
          type: 'AUTH_SUCCESS',
          payload: { user: response.user, tokens },
        });
      } catch (error: any) {
        const message = error.response?.data?.message || 'Registration failed';
        dispatch({ type: 'AUTH_FAILURE', payload: message });
        throw new Error(message);
      }
    },
    []
  );

  const logout = useCallback(async () => {
    try {
      if (state.tokens?.refreshToken) {
        await authService.logout(state.tokens.refreshToken);
      }
    } catch (error) {
      console.error('Logout API error:', error);
    } finally {
      await clearAllAuthData();
      dispatch({ type: 'LOGOUT' });
    }
  }, [state.tokens?.refreshToken]);

  const updateProfile = useCallback(async (updates: Partial<User>) => {
    try {
      const updatedUser = await authService.updateProfile(updates);
      await userStorage.saveUser(updatedUser);
      dispatch({ type: 'UPDATE_USER', payload: updatedUser });
    } catch (error: any) {
      throw new Error(error.response?.data?.message || 'Update failed');
    }
  }, []);

  const value = useMemo(
    () => ({
      ...state,
      login,
      register,
      logout,
      updateProfile,
    }),
    [state, login, register, logout, updateProfile]
  );

  return <AuthContext.Provider value={value}>{children}</AuthContext.Provider>;
};

export const useAuth = (): AuthContextType => {
  const context = useContext(AuthContext);
  if (context === undefined) {
    throw new Error('useAuth must be used within an AuthProvider');
  }
  return context;
};
Login Screen
Create a complete login screen with validation and error handling:
// src/screens/LoginScreen.tsx
import React, { useState } from 'react';
import {
  View,
  Text,
  TextInput,
  TouchableOpacity,
  StyleSheet,
  ActivityIndicator,
  KeyboardAvoidingView,
  Platform,
  Alert,
} from 'react-native';
import { useAuth } from '../auth/AuthContext';
import { NativeStackNavigationProp } from '@react-navigation/native-stack';

type Props = {
  navigation: NativeStackNavigationProp<any>;
};

const LoginScreen: React.FC<Props> = ({ navigation }) => {
  const { login, isLoading, error } = useAuth();
  const [email, setEmail] = useState('');
  const [password, setPassword] = useState('');
  const [localError, setLocalError] = useState('');

  const validateForm = (): boolean => {
    if (!email.trim()) {
      setLocalError('Email is required');
      return false;
    }
    if (!/\S+@\S+\.\S+/.test(email)) {
      setLocalError('Please enter a valid email');
      return false;
    }
    if (!password) {
      setLocalError('Password is required');
      return false;
    }
    if (password.length < 6) {
      setLocalError('Password must be at least 6 characters');
      return false;
    }
    setLocalError('');
    return true;
  };

  const handleLogin = async () => {
    if (!validateForm()) return;

    try {
      await login(email.toLowerCase().trim(), password);
    } catch (err: any) {
      Alert.alert('Login Failed', err.message);
    }
  };

  return (
    <KeyboardAvoidingView
      style={styles.container}
      behavior={Platform.OS === 'ios' ? 'padding' : 'height'}
    >
      <View style={styles.form}>
        <Text style={styles.title}>Welcome Back</Text>
        <Text style={styles.subtitle}>Sign in to continue</Text>

        {(localError || error) && (
          <Text style={styles.error}>{localError || error}</Text>
        )}

        <TextInput
          style={styles.input}
          placeholder="Email"
          value={email}
          onChangeText={setEmail}
          keyboardType="email-address"
          autoCapitalize="none"
          autoCorrect={false}
          editable={!isLoading}
        />

        <TextInput
          style={styles.input}
          placeholder="Password"
          value={password}
          onChangeText={setPassword}
          secureTextEntry
          editable={!isLoading}
        />

        <TouchableOpacity
          style={[styles.button, isLoading && styles.buttonDisabled]}
          onPress={handleLogin}
          disabled={isLoading}
        >
          {isLoading ? (
            <ActivityIndicator color="#fff" />
          ) : (
            <Text style={styles.buttonText}>Sign In</Text>
          )}
        </TouchableOpacity>

        <TouchableOpacity
          style={styles.linkButton}
          onPress={() => navigation.navigate('ForgotPassword')}
        >
          <Text style={styles.linkText}>Forgot Password?</Text>
        </TouchableOpacity>

        <TouchableOpacity
          style={styles.linkButton}
          onPress={() => navigation.navigate('Register')}
        >
          <Text style={styles.linkText}>
            Don't have an account? <Text style={styles.linkBold}>Sign Up</Text>
          </Text>
        </TouchableOpacity>
      </View>
    </KeyboardAvoidingView>
  );
};

const styles = StyleSheet.create({
  container: { flex: 1, backgroundColor: '#f5f5f5' },
  form: { flex: 1, justifyContent: 'center', padding: 24 },
  title: { fontSize: 32, fontWeight: 'bold', color: '#333', marginBottom: 8 },
  subtitle: { fontSize: 16, color: '#666', marginBottom: 32 },
  input: {
    backgroundColor: '#fff',
    borderRadius: 8,
    padding: 16,
    marginBottom: 16,
    fontSize: 16,
    borderWidth: 1,
    borderColor: '#ddd',
  },
  button: {
    backgroundColor: '#007AFF',
    borderRadius: 8,
    padding: 16,
    alignItems: 'center',
    marginTop: 8,
  },
  buttonDisabled: { backgroundColor: '#ccc' },
  buttonText: { color: '#fff', fontSize: 18, fontWeight: '600' },
  error: { color: '#ff3b30', marginBottom: 16, textAlign: 'center' },
  linkButton: { marginTop: 16, alignItems: 'center' },
  linkText: { color: '#666', fontSize: 14 },
  linkBold: { color: '#007AFF', fontWeight: '600' },
});

export default LoginScreen;
Protected Navigation
Set up navigation that automatically switches based on auth state:
// src/navigation/AppNavigator.tsx
import React from 'react';
import { NavigationContainer } from '@react-navigation/native';
import { createNativeStackNavigator } from '@react-navigation/native-stack';
import { useAuth } from '../auth/AuthContext';
import LoadingScreen from '../components/LoadingScreen';

// Screens
import LoginScreen from '../screens/LoginScreen';
import RegisterScreen from '../screens/RegisterScreen';
import HomeScreen from '../screens/HomeScreen';
import ProfileScreen from '../screens/ProfileScreen';

const Stack = createNativeStackNavigator();

const AuthStack = () => (
  <Stack.Navigator screenOptions={{ headerShown: false }}>
    <Stack.Screen name="Login" component={LoginScreen} />
    <Stack.Screen name="Register" component={RegisterScreen} />
    <Stack.Screen name="ForgotPassword" component={ForgotPasswordScreen} />
  </Stack.Navigator>
);

const MainStack = () => (
  <Stack.Navigator>
    <Stack.Screen name="Home" component={HomeScreen} />
    <Stack.Screen name="Profile" component={ProfileScreen} />
  </Stack.Navigator>
);

const AppNavigator: React.FC = () => {
  const { isAuthenticated, isLoading } = useAuth();

  if (isLoading) {
    return <LoadingScreen />;
  }

  return (
    <NavigationContainer>
      {isAuthenticated ? <MainStack /> : <AuthStack />}
    </NavigationContainer>
  );
};

export default AppNavigator;
App Entry Point
// App.tsx
import React from 'react';
import { AuthProvider } from './src/auth/AuthContext';
import AppNavigator from './src/navigation/AppNavigator';

export default function App() {
  return (
    <AuthProvider>
      <AppNavigator />
    </AuthProvider>
  );
}
Common Mistakes to Avoid
Watch out for these common pitfalls when implementing authentication:
1. Storing Tokens in Plain AsyncStorage
// Wrong - tokens stored in plain text
await AsyncStorage.setItem('token', accessToken);

// Correct - use SecureStore or encrypted storage
await SecureStore.setItemAsync('token', accessToken);
2. Not Handling Token Expiration
// Wrong - assuming token is always valid
const token = await getToken();
api.defaults.headers.Authorization = `Bearer ${token}`;

// Correct - check expiration and refresh if needed
const tokens = await tokenStorage.getTokens();
if (tokens && tokens.expiresAt < Date.now()) {
  const newTokens = await refreshTokens(tokens.refreshToken);
  await tokenStorage.saveTokens(newTokens);
}
3. Missing useContext Error Boundary
// Wrong - returns undefined if used outside provider
export const useAuth = () => useContext(AuthContext);

// Correct - throw helpful error
export const useAuth = () => {
  const context = useContext(AuthContext);
  if (context === undefined) {
    throw new Error('useAuth must be used within AuthProvider');
  }
  return context;
};
4. Not Clearing Data on Logout
// Wrong - only updating state
const logout = () => dispatch({ type: 'LOGOUT' });

// Correct - clear storage and invalidate server session
const logout = async () => {
  await authService.logout(tokens.refreshToken); // Invalidate on server
  await clearAllAuthData(); // Clear local storage
  dispatch({ type: 'LOGOUT' });
};
Final Thoughts
The Context API provides everything you need for production-ready authentication in React Native. By combining it with secure storage, proper token management, and automatic refresh logic, you get a robust authentication system without external state management libraries. Start with this foundation and extend it with features like biometric authentication, social login, or multi-factor authentication as your app grows.
For more on mobile development patterns, read Flutter Login/Register Flow with Riverpod and Feature-First Folder Structure. For official React Native documentation, visit the React Native Security Guide and the React Context Documentation.


1 Comment