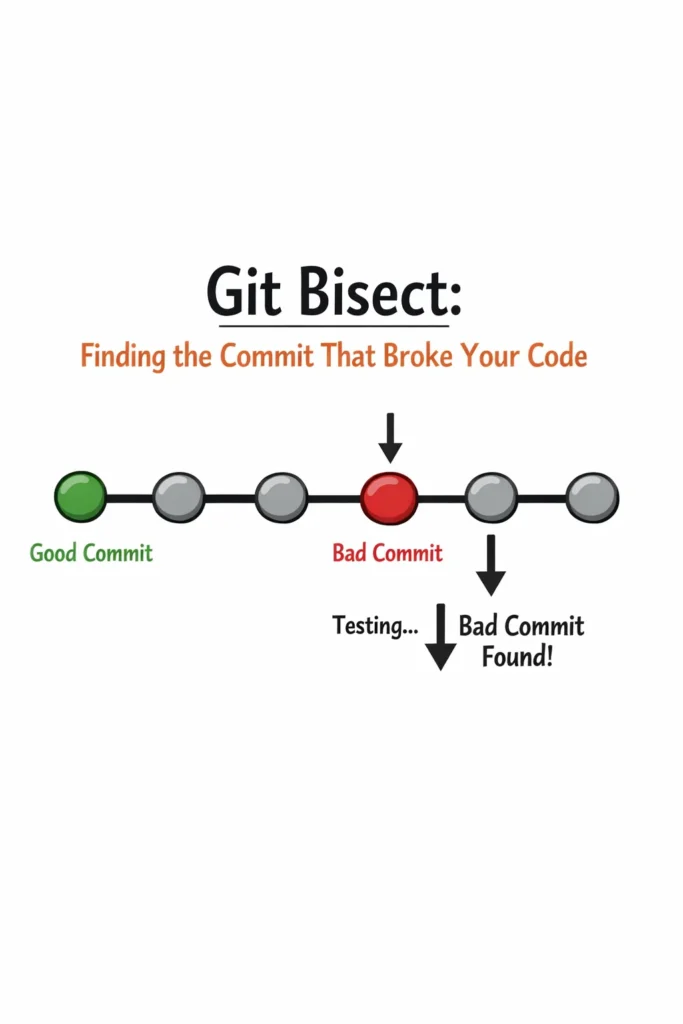
Something broke. The feature worked last week, but now it does not. Somewhere in the 47 commits merged since then, one of them introduced the bug. You could read each commit diff manually, but that takes hours and assumes you can spot the problem by reading code. A faster approach is to let Git find the exact commit for you.
Git bisect performs a binary search through your commit history. You tell it one commit where things worked (good) and one where things are broken (bad). It picks the commit halfway between, you test it, and based on your answer, it eliminates half the remaining commits. Repeat this process, and git bisect finds the exact breaking commit in log2(n) steps — for 47 commits, that is roughly 6 tests instead of 47.
This tutorial covers using git bisect manually, automating it with test scripts, handling tricky scenarios like merge commits and build failures, and integrating bisect into your debugging workflow.
How Git Bisect Works
Git bisect uses binary search — the same algorithm that makes looking up a word in a dictionary fast. Instead of checking every commit sequentially, it repeatedly halves the search space.
The Algorithm
- You mark a known bad commit (where the bug exists) and a known good commit (where the bug does not exist)
- Git checks out the commit halfway between good and bad
- You test whether the bug exists at this commit
- If bad: the bug was introduced between good and this midpoint — Git narrows the search to the first half
- If good: the bug was introduced between this midpoint and bad — Git narrows to the second half
- Repeat until one commit remains — that is the commit that introduced the bug
For 1,000 commits between good and bad, git bisect finds the breaking commit in approximately 10 steps. For 100 commits, roughly 7 steps. This efficiency makes git bisect practical even for large, active repositories.
Manual Git Bisect
The basic workflow requires three commands: start, mark the endpoints, and test each midpoint.
Step-by-Step
# Step 1: Start bisecting
git bisect start

# Step 2: Mark the current commit as bad (the bug exists here)
git bisect bad

# Step 3: Mark a known good commit (the bug did not exist here)
# Use a tag, branch, or commit SHA
git bisect good v2.3.0
After marking good and bad, Git checks out a commit in the middle:
Bisecting: 23 revisions left to test after this (roughly 5 steps)
[a1b2c3d] Refactor payment module to use async handlers
Now test whether the bug exists at this commit. Run the application, execute the failing test, or check the behavior manually. Then tell Git the result:
# If the bug exists at this commit:
git bisect bad

# If the bug does NOT exist at this commit:
git bisect good
Git checks out another midpoint and repeats. After several iterations:
a1b2c3d4e5f6 is the first bad commit
commit a1b2c3d4e5f6
Author: Developer Name <dev@example.com>
Date:   Mon Apr 7 14:32:00 2026 -0400

    Add retry logic to webhook handler

 src/webhooks/handler.ts | 23 ++++++++++++---------
 1 file changed, 14 insertions(+), 9 deletions(-)
Git identifies the exact commit that introduced the bug. You now know exactly which file changed, who made the change, and when — giving you a focused starting point for debugging instead of searching the entire codebase.
Finishing the Bisect
# Return to your original branch when done
git bisect reset
Always run git bisect reset when you are done. This returns your working directory to the branch you were on before starting the bisect. Without it, you remain in a detached HEAD state at whatever commit bisect last checked out.
Automated Git Bisect
Manual bisecting works, but testing each commit by hand is tedious. If you can express the test as a command that exits with 0 (good) or non-zero (bad), git bisect can run the entire search automatically.
Using a Test Script
# Automated bisect with a test command
git bisect start
git bisect bad HEAD
git bisect good v2.3.0
git bisect run npm test -- --testPathPattern="checkout"
Git bisect runs npm test -- --testPathPattern="checkout" at each midpoint. If the test passes (exit code 0), the commit is marked good. If it fails (non-zero exit code), the commit is marked bad. The entire binary search completes without human intervention.
Writing a Custom Test Script
Sometimes the bug is not captured by an existing test. Write a small script that checks for the specific behavior:
#!/bin/bash
# bisect-test.sh — Test if the checkout total calculation is correct

# Build the project (skip if not needed)
npm run build 2>/dev/null

# Run a specific assertion
node -e "
const { calculateTotal } = require('./dist/checkout');
const total = calculateTotal([
  { price: 10.00, quantity: 2 },
  { price: 5.50, quantity: 1 }
]);
if (Math.abs(total - 25.50) > 0.01) {
  console.error('FAIL: Expected 25.50, got', total);
  process.exit(1);
}
console.log('PASS: Total is correct');
"
# Make the script executable and run automated bisect
chmod +x bisect-test.sh
git bisect start
git bisect bad HEAD
git bisect good v2.3.0
git bisect run ./bisect-test.sh
The script returns exit code 0 for correct behavior and 1 for incorrect behavior. Git bisect interprets these exit codes to drive the binary search.
Using Existing Test Suites
For teams with comprehensive test suites, automated bisect with the relevant test is the fastest debugging approach. Run only the specific failing test, not the entire suite — full test suite runs at each bisect step would take far too long.
# Jest: run a specific test file
git bisect run npx jest tests/checkout.test.ts

# Vitest: run a specific test
git bisect run npx vitest run tests/checkout.test.ts

# Python: run a specific test
git bisect run python -m pytest tests/test_checkout.py -x

# Go: run a specific test
git bisect run go test ./checkout/ -run TestCalculateTotal
The -x flag (pytest) and running a single test file keep each bisect step fast. A bisect that takes 30 seconds per step across 7 steps completes in under 4 minutes — far faster than manually reviewing dozens of commits.
Handling Tricky Scenarios
Real codebases are messier than textbook examples. Git bisect handles several scenarios that would otherwise complicate the binary search.
Commits That Cannot Be Tested
Some commits in the search range might not compile, have broken dependencies, or be otherwise untestable. Mark these as skip instead of good or bad:
# This commit doesn't compile — skip it
git bisect skip
Git skips the untestable commit and picks a nearby one instead. The search continues with slightly less efficiency (some commits are excluded from testing), but the result is still accurate.
For automated bisect, use exit code 125 to indicate “skip”:
#!/bin/bash
# bisect-test.sh with skip handling

# Try to build — if it fails, skip this commit
npm run build 2>/dev/null
if [ $? -ne 0 ]; then
  echo "Build failed — skipping this commit"
  exit 125  # Special exit code: tell bisect to skip
fi

# Run the actual test
npm test -- --testPathPattern="checkout"
Exit code 125 is the conventional “skip” signal for git bisect. Any other non-zero exit code means “bad.”
Merge Commits
Merge commits can complicate bisect because the binary search might land on a merge commit that introduces no changes itself — it only combines two branches. When bisecting, Git follows the first-parent chain by default, which typically produces meaningful commits to test.
If merge commits cause confusion, start the bisect with --first-parent to follow only the main branch’s history:
git bisect start --first-parent
git bisect bad HEAD
git bisect good v2.3.0
This skips commits from feature branches and only tests the merge points on main. Since each merge point represents a complete feature or fix, these are usually more testable than individual commits from a feature branch.
The Bug Existed Before the “Good” Commit
If you mark a good commit incorrectly (the bug actually existed there too), bisect produces a misleading result. Before starting, always verify your good commit:
# Verify the good commit is actually good
git checkout v2.3.0
# Test manually or run the failing test
npm test -- --testPathPattern="checkout"
# Confirm it passes, then start bisecting
git checkout main
git bisect start
Taking 30 seconds to verify the endpoints saves the frustration of a bisect that leads to the wrong commit.
Advanced Git Bisect Patterns
Bisecting Across Multiple Test Criteria
Sometimes a single bug has multiple symptoms. Your test script can check multiple conditions:
#!/bin/bash
# Check that the API returns the correct status code AND the right body

response=$(curl -s -w "\n%{http_code}" http://localhost:3000/api/checkout)
body=$(echo "$response" | head -1)
status=$(echo "$response" | tail -1)

if [ "$status" != "200" ]; then
  echo "FAIL: Expected status 200, got $status"
  exit 1
fi

if ! echo "$body" | grep -q '"total"'; then
  echo "FAIL: Response missing 'total' field"
  exit 1
fi

echo "PASS"
exit 0
Bisecting with Database Migrations
If commits in the bisect range include database migrations, each step might need to run migrations before testing. Include migration execution in the test script:
#!/bin/bash
# Run migrations, then test

npm run migrate 2>/dev/null
if [ $? -ne 0 ]; then
  exit 125  # Migration failed — skip this commit
fi

npm test -- --testPathPattern="checkout"
Logging Bisect Progress
Git bisect logs its progress. You can view and replay the bisect session:
# View the bisect log
git bisect log

# Save the log to replay later
git bisect log > bisect-session.log

# Replay a saved bisect session
git bisect replay bisect-session.log
Replaying is useful when you want to share the bisect process with a teammate or re-run it after realizing you marked a commit incorrectly. Instead of starting from scratch, edit the log file to correct the mistake and replay.
Integrating Bisect into Your Debugging Workflow
Git bisect is most valuable as part of a structured debugging process, not as a standalone tool.
When to Reach for Bisect
- The bug exists now but did not exist at a known earlier point
- You cannot identify the cause by reading the error message or stack trace
- Multiple files changed between the working and broken states, and the cause is not obvious
- The CI pipeline passed on all recent commits, so the bug slipped through test coverage
When Bisect Is Not the Right Tool
- You know which file or module is broken — just read the recent diffs for that file with
git log -p -- path/to/file - The bug is in configuration (environment variables, deployment settings) rather than in code — bisect searches commits, not deployments
- Only one or two commits happened since the last known good state — reading two diffs is faster than setting up bisect
The Full Debugging Sequence
- Reproduce the bug — confirm you can trigger it consistently
- Identify the last known good state — a release tag, a specific commit, or “it worked yesterday”
- Write a test that fails because of the bug (this becomes your bisect test)
- Run bisect with the test script
- Examine the identified commit — read the diff, understand what changed
- Fix the bug — knowing the exact cause makes the fix focused
- Add the test to your suite so the regression is caught by CI going forward
Step 3 is the most valuable. Writing a test that reproduces the bug not only drives the bisect but also prevents the same regression from recurring. After bisect identifies the commit, the test becomes a permanent part of your test suite.
Real-World Scenario: Bisecting a Performance Regression
A team notices that their API’s p95 response time for the product search endpoint has increased from 120ms to 450ms. The regression appeared sometime in the last two weeks, during which 83 commits were merged to main. Reading 83 diffs to find a performance regression is impractical — the cause could be a subtle query change, an N+1 problem, or a missing index.
The team writes a bisect test script that measures search response time:
#!/bin/bash
# Start the server in the background
npm run build && npm start &
SERVER_PID=$!
sleep 3  # Wait for server startup

# Run 10 search requests and measure average time
total_time=0
for i in $(seq 1 10); do
  time_ms=$(curl -s -o /dev/null -w "%{time_total}" http://localhost:3000/api/search?q=laptop)
  time_ms=$(echo "$time_ms * 1000" | bc)
  total_time=$(echo "$total_time + $time_ms" | bc)
done
avg_time=$(echo "$total_time / 10" | bc)

kill $SERVER_PID 2>/dev/null
wait $SERVER_PID 2>/dev/null

echo "Average response time: ${avg_time}ms"

if [ $(echo "$avg_time > 300" | bc) -eq 1 ]; then
  echo "FAIL: Too slow (${avg_time}ms > 300ms threshold)"
  exit 1
fi

echo "PASS"
exit 0
git bisect start
git bisect bad HEAD
git bisect good v2.8.0  # Two weeks ago, performance was fine
git bisect run ./bisect-perf.sh
After 7 steps (log2(83) ≈ 6.4), bisect identifies a commit that changed the search query to include a JOIN with a newly added product attributes table. The JOIN was correct but lacked an index on the join column. Adding the index brings response time back to 110ms.
Without bisect, the team would have spent hours profiling the current codebase and guessing which change caused the regression. With bisect, they found the exact commit in under 15 minutes and fixed the issue in another 10.
When to Use Git Bisect
- A regression exists between a known good state and the current bad state, with many commits in between
- The bug can be verified with a repeatable test (manual or automated)
- Reading commit diffs manually is impractical due to the number of commits
- Performance regressions where the cause is not obvious from profiling alone
- Flaky behavior that appeared recently but has no obvious trigger in the code changes
When NOT to Use Git Bisect
- Fewer than 5 commits between good and bad — reading the diffs directly is faster
- The bug cannot be reproduced consistently — bisect requires a reliable pass/fail signal at each step
- The bug is in configuration or infrastructure rather than in committed code
- You already know which module or file is responsible — use
git log -p -- fileinstead
Common Mistakes with Git Bisect
- Forgetting to run
git bisect resetafter finishing, leaving the repository in a detached HEAD state that confuses subsequent git operations - Marking the wrong commit as good or bad, which sends the binary search in the wrong direction and produces a misleading result — always verify your endpoints before starting
- Running the entire test suite at each bisect step instead of isolating the specific failing test, turning a 5-minute bisect into an hour-long process
- Not handling untestable commits in automated scripts (missing exit code 125 for build failures), causing bisect to incorrectly mark broken builds as “bad” when they might be unrelated to the actual bug
- Starting a bisect without first confirming the bug is reproducible — intermittent failures produce unreliable bisect results
- Ignoring the bisect result because it points to a commit that “looks fine” — the commit might introduce the bug indirectly (changing a shared dependency, altering execution order, modifying default values)
Making Git Bisect Part of Your Toolkit
Git bisect turns the question “which of these 100 commits broke things?” into a 7-step binary search. The manual workflow is straightforward: mark good, mark bad, test each midpoint. Automated bisect with a test script removes even that effort — write the test once, and Git finds the breaking commit without further interaction.
The key to effective git bisect is writing a reliable test for the specific regression. That test drives the bisect and then stays in your test suite as a permanent regression guard. Every time you use bisect, you end up with both a fix and a test — making the same bug harder to reintroduce in the future.